


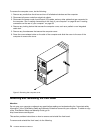
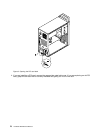
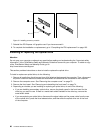


Figure 10. Installing a PCI card
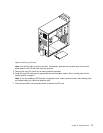
8. To complete the installation or replacement, go to “Completing the FRU replacement” on page 103.
Installing or replacing a memory module
Attention
Do not open your computer or attempt any repair before reading and understanding the “Important safety
information” in the ThinkStation Safety and Warranty Guide that came with your computer. To obtain a copy
of the ThinkStation Safety and Warranty Guide, go to:
http://www.lenovo.com/support
This section provides instructions on how to install or replace a memory module.
Your computer has four slots for installing or replacing memory modules that provide up to a maximum of 16
GB system memory. When installing or replacing a memory module, use the following guidelines:
• Use either DDR3 ECC UDIMMs or DDR3 Non-ECC UDIMMs for your computer. Do not install both DDR3
ECC UDIMMs and DDR3 Non-ECC UDIMMs in the same computer.
• Use 1 GB, 2 GB, or 4 GB memory modules in any combination up to a maximum of 16 GB.
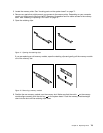
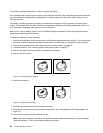
• Install memory modules in the sequence of DIMM 1, DIMM 3, DIMM 2, and DIMM 4. See “Locating
parts on the system board” on page 71
.
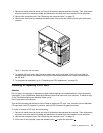
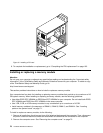
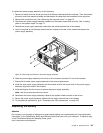
To install or replace a memory module, do the following:
1. Remove all media from the drives and turn off all attached devices and the computer. Then, disconnect
all power cords from electrical outlets and disconnect all cables that are connected to the computer.
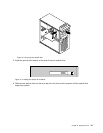
2. Remove the computer cover. See “Removing the computer cover” on page 73.
78 Hardware Maintenance Manual