


101 100
To manually create a custom paper size
(Windows NT & 2000):
1. Go to Start > Settings > Printers.
2. Inside the Printers dialog, choose Server
Properties from the main File menu.
3. Check the box Create New Form.
4. Set the Width to 8 inches and the Height to
4.67 inches. (Left/Right, Top/Bottom margins
can be left at zero.)
5. Name your form and then click Save Form.
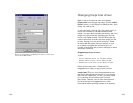
6. Go back to the MASTERFORM print preview
screen. With the print preview open, choose
Page Setup from the File menu and select the
Page tab.
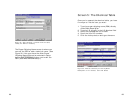
7. Select the form size you have just made into
the Paper Size field as shown in Figure 38.
8. Click OK to exit and save your settings.
Warning! Windows NT users should read the
section in Troubleshooting, Custom paper size not
in paper size list.
To manually create a custom paper size
(Windows 95 & 98):
1. When you are at the print preview image of
your form and are ready to print, choose Page
Setup from the main File menu and then
select the Page tab.
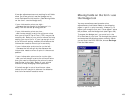
2. Select the option Use Specific Printer.
3. Click the Printer button, then select the
correct printer from the drop-down list.
4. Click the Properties button.
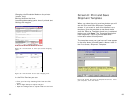
5. Inside Properties, scroll to find the icon for
Custom. Double-click the Custom icon and
set the paper size to: Width 8 in, Height
4.67 in (800 / 467).
6. Return to the Page tab and make sure the
Paper Size field reads User-defined.
7. Click OK to exit and save your settings.
If you find that you cannot create a custom
paper size because the option to do so isn’t
enabled, follow the steps outlined in Changing the
Printer Driver and Changing the Emulation Mode
on the Printer before attempting to create a
custom paper size.