


Linksys E3000 Chapter 1: Product Overview
1
High Performance Wireless-N Router
Chapter 1: Product Overview
Thank you for choosing the Linksys E3000 High
Performance Wireless-N Router. The Router lets you
access the Internet via a wireless connection or through
one of its four switched Gigabit Ethernet ports. With
the built-in Storage Link, you can easily add gigabytes
of storage space onto your network using USB 2.0 hard
drives, or plug in a USB flash disk to access your portable
data files. The E3000’s built-in media server streams music,
video and photos from an attached storage device to
any UPnP-compatible media adapter or player. A variety
of security features help to protect your data and your
privacy while you are online. Security features include
Wi-Fi Protected Access 2 (WPA2) security which provides
encryption for data on your wireless network, a Stateful
Packet Inspection (SPI) firewall to block unwanted access
to your Router, and Network Address Translation (NAT)
technology to protect and allow your entire network to
access the Internet using a single Internet IP address.
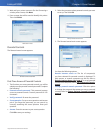
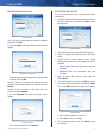
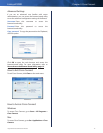
Setup and use of the Router is easy using Cisco Connect,
the software that is installed when you run the included
CD. Advanced configuration of the Router is available
through the provided browser-based utility.
For more wireless bandwidth, the Router can create two
simultaneous yet separate Wireless-N networks, one
using the 5 GHz band and one using the 2.4 GHz band.
For example, use the Wireless-N 2.4 GHz network to
surf, e-mail, and print while keeping the less crowded,
Wireless-N 5 GHz network free for time-sensitive traffic
like music, gaming, and high-definition video. For more
information, refer to Simultaneous Networks, page 19.
The Guest Access features allows you to provide Internet
access to guests visiting your home without granting
them access to your local network.
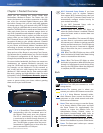
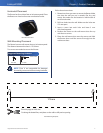
Top
1, 2, 3, 4 (Green/Blue) These numbered LEDs,
corresponding with the numbered ports on
the Router’s back panel, serve two purposes.
The LED is continuously lit when the Router
is connected to a device through that port. It
flashes to indicate network activity over that
port. The LED lights up green when the port is
connected to a gigabit port or blue when the
port is connected to a 10/100 port.
Wi-Fi Protected Setup Button If you have
client devices, such as wireless adapters,
that support Wi-Fi Protected Setup, then you
can use the Wi-Fi Protected Setup button to
automatically configure wireless security for
your wireless network(s).
To use Wi-Fi Protected Setup, refer to
Wi-Fi Protected Setup, page 21.
Wireless (Blue) The Wireless LED lights up
when the wireless feature is enabled. It flashes
when the Router sends or receives data over
the network.
Internet (Green/Blue) The Internet LED lights
up when there is a connection made through
the Internet port. It flashes to indicate network
activity over the Internet port. The LED lights up
green when the port is connected to a gigabit
port or blue when the port is connected to a
10/100 port.
USB (Blue) The USB LED lights up when a USB
device is attached. It flashes when data is being
sent to or received from this device.
Power (Blue) The Power LED lights up when
the Router is powered on. When the Router goes
through its self-diagnostic mode during every
boot-up, the LED flashes. When the diagnostic
is complete, the LED is continuously lit.
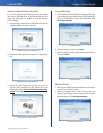
Back
Reset
Internet
Ethernet4 3 2 1
Power
12VDC
USB
USB Port The USB port connects to a USB
storage device.
Internet The Internet port is where you
connect your cable or DSL Internet connection.
4, 3, 2, 1 Using Ethernet (network) cables,
these Ethernet ports connect the Router to
computers on your wired network and other
Ethernet network devices.
Reset There are two ways to reset the Router
to its factory defaults. Either press and hold
the Reset Button for approximately five
seconds, or restore the defaults from the
Administration > Factory Defaults screen in
the Router’s browser-based utility (refer to
Administration > Factory Defaults, page 40).
Power Switch Press the I end to power on the
Router. Press the O end to power off the Router.
Power The Power port is where you connect
the power adapter.