


19
How to use the Remote Control
How to use the Remote Control
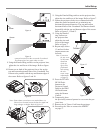
The supplied Remote Control is capable of directly control-
ling the functions of the McIntosh MDLP2 Video Projector
and VP1000 Video Processor. For additional information
on the various video adjustments and their purpose, please
refer to the “How to Operate the MDLP2” section of this
manual starting on page 22.
Note: At times it might appear the selected function is not re-
sponding when using the Remote Control. This can be
due to the Input selected, the presence of a video signal
for that input and the Picture Mode selected. Please
refer to page 22 for additional information.
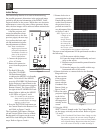
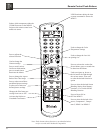
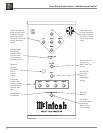
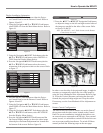
Device Selection
This Remote Control is used to operate the McIntosh
MDLP2 Video Projector and the VP1000 Video Processor.
When using the Remote Control with the MDLP2, first
press the DEVICE PROJector push-button and then press
the push-button for the desired function. It is only required
to press the DEVICE PROJector push-button once, un-
less the Remote Control is also being used to control the
VP1000 Video Processor.
When the Remote Control is being used to control both
McIntosh Components, either the DEVICE PROCessor
or the DEVICE PROJector push-button would need to
be pressed first, before sending
commands to the desired compo-
nent.
Note: When any of the Push-but-
tons in the adjacent illustra-
tion are pressed, the Remote Control automatically
switches to sending VP1000 Video Processor IR Codes.
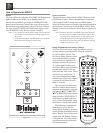
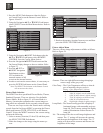
Power On
Press PROJector ON to switch the power On to the
MDLP2.
Power Off
Press PROJector OFF to switch the power Off to the
MDLP2.
Adjust Functions
After menu functions displaying a horizontal adjust-
ment bar on the screen have been selected, such as Image
Brightness, the ADJUST+ or ADJUST- push-buttons may
be used to vary the brightness of the image.
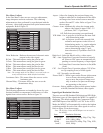
Color Temperature
Allows for changing on the fly
1
the color neutrality of the
image from warm thru cool (six different settings).
Iris
Allows for changing on the fly
1
the overall Image Bright-
ness by varying the opening size of the Lens Iris (two
different settings).
Gamma
Allows for changing on the fly
1
selected narrow segments
of the gray scale, where the selected segment range of
brightness/contrast is expanded (eight different segments).
Note: The term “Gray Scale” refers to the image intensity
range from Black to White with shades of gray in-be-
tween.
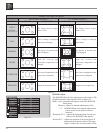
Aspect Ratio
Allows for presenting the image with different height to
width sizes. The choices available vary according to the
original source material type, projector settings and input
used.
Picture Modes
There are three preset modes THTR (Theater), STD (Stan-
dard) and DYN (Dynamic) along with three user group set
selections, G1, G2 or G3. With every press of the G1 push-
button a different User Setting will be selected (U1, U2 or
U3). The G2 push-button will select (U4, U5 or U6) and the
G3 push-button selects (U7, U8 or U9). Refer to “How to
Operate the MDLP2” for additional information on using
the User defined image settings.
Note: Changing the Picture Mode using the Remote Control
Picture Mode Push-buttons will not occur if the On-
Screen Menu is active. If the Menu is active, the Picture
Mode may be changed using the Picture Mode Menu
functions.
1
When some Picture Modes are selected, “the changing on the
fly” feature is not available.