


22
Source Selection
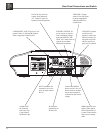
The default Source Select for the MDLP2 Projector is the
COMPonent 1 Input. There is an additional Component
Video Input (COMP 2) along with two HDMI Inputs.
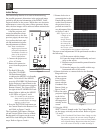
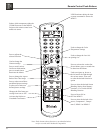
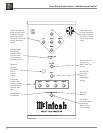
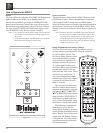
Select the desired source using the push-buttons located on
the Projector Control Panel or on the PROJ INPUT Push-
buttons located on the Remote Control. Refer to figures 14
and 15.
Note: Whenever possible use HDMI connections between
the source device output to the MDLP2 Input. This
will yield better image quality, as the video signal
will go through one less analog to digital conver-
sion process and possibly one less digital to analog
conversion process as well.
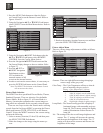
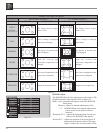
Image Adjustments and Setting changes
All of the electronic based image adjustments and pro-
cessing settings are performed by using the extensive
On-Screen Menu System. The
On-Screen Menu System is inter-
active and the ability to change
a given setting is dependent on
the Input selected, the presence
of a video signal for that input,
the Picture Mode selected and are
automatically saved for the cur-
rently selected video input. When
a menu item is “grayed out” it
can not be changed until either
another Input is selected, a signal
is present or a different Picture
mode is selected.
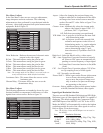
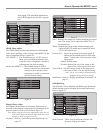
The selection of a menu item
and the available choices/adjust-
ments are performed by using the
Navigation (◄LEFT, ►RIGHT,
▲UP or ▼DOWN) Push-buttons
along with the ENTER/SELECT
Push-buttons located on the Pro-
jector Control Panel and/or using
the Remote Control Push-buttons.
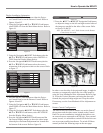
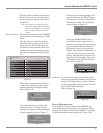
The following examples will
illustrate how to use the On-
Screen Menu System by perform-
ing the Display Installation Orien-
tation, Display Vertical Keystone
Adjustment and Remote Control
Configuration. All of the remain-
ing menu options are performed
in a similar manner.
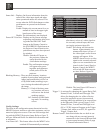
How to Operate the MDLP2
Power
The Red LED to the left of the STANDBY/ON Push-button
lights to indicate the MDLP2 is in Standby mode. To
Switch ON the MDLP2, press the STANDBY/ON Push-
button on the Projector Control Panel or the Projector ON
Push-button using the Remote Control. The Green LED to
the right of the STANDBY/ON Push-button lights to indi-
cate the MDLP2 is ON. Refer to figures 14 and 15.
Notes: 1. It is normal for the projector lamp warm up period
to last about a minute before an image appears on
the screen.
2. If the Initial Setup for the MDLP2 has not yet been
performed refer to page 14 at this time.
2
Figure 14
Figure 15