


14
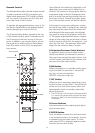
Remote Control
The Meridian/Faroudja infra-red remote control
is used to operate both DILA projectors and
digital video processors (DVP) made by Merid-
ian. As a result, the remote control unit’s but-
tons often have a dual function.
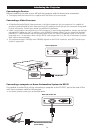
To operate the appropriate device, press its Se-
lect button (labelled A on the diagram below)
before attempting to control the unit.
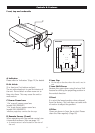
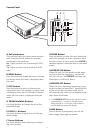
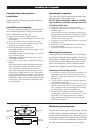
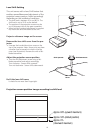
The IR transmitting diode is located at the top
of the remote control: point it towards one of
the IR sensors at the front or rear of the pro-
jector. In addition, you may be able to control
the projector by reflecting the infrared beam
from the screen so that it hits the projector’s
front sensor.
DVP
DILA
On
Off
Profile
Menu
Enter
DVI
Video
RGB
Colour
Tint
Detail
Anamorphic
4:3
Letterbox
1 2
3
4
5
6
7
8 9
0
Bright.
Cont.
Light
Hide Zoom
Test
T
W
Focus
Preset
Exit
Pattern
YCrCb
S-Video
Store
Bypass
Printed in White
Backlit panel
Select projector
Select processor
Backlit
A
B
C
N
J
M
F
D
K
G
L
E
H
P
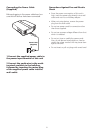
How effective this method of operation is will
depend on your screen and its reflectivity to
infrared. The sensors on the projector have an
acceptance angle of about 30 degrees either
side of a centre line running through the unit
from front to back. Outside this angle, opera-
tion of the remote control will be less reliable.
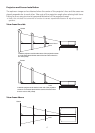
In the case of using screen reflection, remem-
ber that IR rays travel in straight lines, and that
rays reaching the screen from the remote will
be reflected at the same angle; the reflected
rays need to arrive at the projector within the
+/- 30 degree angle described above. Imagine
where on the screen you would have to throw
a ball to bounce off and hit the projector – just
don’t try it for real. The maximum direct path
length for the remote is about 7metres.
A Projector/Processor Select buttons
To operate a device, press its select button
briefly once before you attempt to control it.
Once you have pressed the select button, that
unit will remain controlled by the remote until
you press the other select button.
B ON Button
When the projector is in standby mode, press-
ing this button for more than 1 second will
turn the unit on and cause the
OPERATE indicator to light up.
C OFF Button
When the unit is operating (projecting), press-
ing this button for more than 1 second switch-
es the unit into cool down mode, which will
automatically switch to standby mode after
about 60 seconds.
• The OFF button will not work until approximate-
ly 1 minute has passed after the lamp has been
turned on. Wait for a minute before pressing it
if necessary.
D Cursor Buttons
Use these buttons when selecting and adjust-
ing the menu items.
E ENTER Button
Press this button to show the next level down
in an hierarchical menu (for example, to enter
a submenu from the main menu). It is also
used when ENTER is displayed against a selec-
tion item on the menu screen.