


22
Basic Operation
After installation, the projector will require
initial set-up, adjustment, alignment and con-
figuration (see next page). Once this has been
done, the unit can be used simply by following
these basic operational procedures.
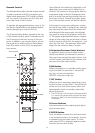
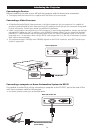
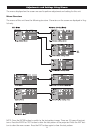
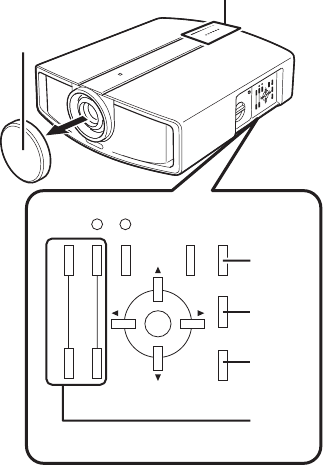
TW
ZOOM
+
-
FOCUS
MENU EXIT
OPERATE
ON
OPERATE
OFF
HIDE
RS232C Rx Tx
1
2
3
6
5
4
Indicators
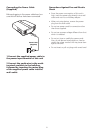
1 Remove the lens cap
We recommend keeping the lens cap in place
when the unit is not in use.
2 Apply Mains Power
On the application of power, the STANDBY
indicator on the unit illuminates.
3 Press the OPERATE ON button for 1
second or more
• You can also press the ON button on the re-
mote having previously pressed the DILA button
• Your video processor may be capable of turn-
ing the projector on and off when required via
RS232 command. Consult your dealer for more
information.
.
The OPERATE indicator on the projector lights
up and the projected image slowly appears.
• Upon projection, the image may flicker for a
few seconds. This is not a fault.
• When the light source is turned on, the lamp
will slowly become brighter. It will take more
than a minute for the brightness to stabilize.
• When video sources employing copy-protection
(HDCP) are in use, it may take a while for the
image to appear, due to the projector and its
source ‘handshaking’
4 Adjusting zoom (image size) and
focus
• These adjustments should normally be carried
out as part of initial set-up. If the message ‘not
available’ is displayed on-screen, these features
have been locked out, and you will need to go
to the Options menu to unlock them.
To enlarge the screen size, press the ZOOM
T button (button 8 on the remote). To reduce
the screen size, press the ZOOM W button
(button 0 on the remote). Adjust the focus set-
ting with the FOCUS +/- buttons (2 and 5 on
the remote).
5 Hiding the image temporarily
Press the HIDE button
• The displayed image will disappear. Press the
HIDE button again to restore the image.
6 Turning off the power
Press the OPERATE OFF button on the panel,
or the OFF button on the remote, for 1 second
or more
The OPERATE indicator turns off, the Standby
indicator starts blinking and the projector
switches to the cool down mode. The cool
down mode will last for about 60 seconds to
allow the light source to cool off.
• The projector switches automatically into stand-
by mode at the end of the cool down mode.
• The OPERATE OFF button will not work until
about a minute has passed after the light source
has been turned on. If necessary, wait for this to
happen.
CAUTION: Do not pull out the plug when the
Standby indicator is blinking. This may shorten
the lamp life and cause a malfunction.
Precautions During Use
This unit makes use of a light source that
reaches a high temperature during projection.
Do not allow projection under the following
conditions; doing so may cause fire or mal-
function of the projector:
• Projection with the unit laid on its sides
• Projection with the unit installed in an un-
reasonable angle. Avoid using this unit at an
inclined angle. Doing so may cause unevenness
in the colour or shorten the lamp life.
• Projection at a location that blocks the air inlets
or exhaust vents (see page 16)
• Projection without removing the lens cap.