


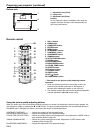

EN-16
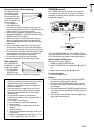
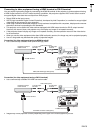
When you connect this projector and a DVI-Digital device (such as a DVD player) via the HDMI terminal or
DVI-D (HDCP) terminal, black color may appear dark and deep, depending on the type of the connected
device.
• This depends on the black level setting of the connected device. There are two kinds of methods to digitally
transfer image data, in which different black level settings are employed respectively. Therefore, the specifi cations
of the signals output from DVD players differ, depending on the type of the digital data transfer method they use.
• Some DVD players are provided with a function to switch the methods to output digital signals. When your DVD
player is provided with such function, set it as follows.
EXPAND or ENHANCED
→
NORMAL
• See the users guide of your DVD player for details.
• When your digital device does not have such function, adjust the BRIGHTNESS to +16 and CONTRAST to -17 in
the IMAGE menu of this projector, or adjust the black color by viewing the image.
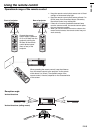
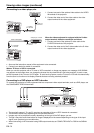
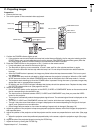
B. Plugging in the power cord
• Use the appropriate power cord for your country.
• This projector uses the power plug of three-pin grounding type. Do not take away the grounding pin from the
power plug. If the power plug doesn’t fi t your wall outlet, ask an electrician to change the wall outlet.
• Use 100-240 V AC 50/60 Hz to prevent fi re or electric shock.
• Do not place any objects on the power cord or do not place the projector near heat sources to prevent damage to
the power cord. If the power cord should be damaged, contact your dealer for replacement because it may cause
fi re or electric shock.
• Do not modify or alter the power cord. If the power cord is modifi ed or altered, it may cause fi re or electric shock.
Caution:
• Plug in the power cord fi rmly. When unplugging, hold and pull the power plug, not the power cord.
• Do not plug in or out the power cord with your hand wet. It may cause electric shock.
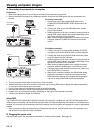
HDMI IN
USBSERIAL
TRI
G
2
1
Earthing
terminal
Power cord (example)
1. Plug the attached power cord into the power cord inlet of
this projector.
2. Plug the other end of the power cord into a power outlet.
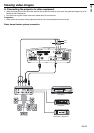
Viewing video images (continued)