


EN-28
To adjust the tone of white (COLOR TEMP.):
You can select a preset color temperature (white tone) using the menu.
(See page 24 for menu setting.)
1. Display the IMAGE menu.
2. Select COLOR TEMP. by pressing the
or
button.
3. Select your desired color temperature by pressing the
or
button.
To cancel the menu:
4. Press the MENU button.
To adjust the tone of white (To customize the color temperature):
To customize (and store) the color temperature to your preference, carry out the following procedure.
(See page 24 for menu setting.)
1. Select COLOR TEMP. in the IMAGE menu.
2. Press the
or
button to select USER
.
3. Press the ENTER button.
4. Press the
or
button to select the desired item.
5. Press the
or
button to adjust the selected item.
6. Repeat steps 4 and 5 for optimum adjustment results.
To cancel the menu:
7. Press the MENU button.
To enable the stored color temperature:
1. Select USER by pressing the COLOR TEMP button on the remote control.
About color temperature
There are different kinds of white color. Color temperature is a way to show the differences in white. White of which
temperature is low appears reddish. When the color temperature rises, white appears bluish. For example, you can
change the color temperature using the following procedures.
To rise the color temperature: Increase the CONTRAST B (blue) and decrease the CONTRAST R (red).
To reduce the color temperature: Decrease the CONTRAST B (blue) and increase the CONTRAST R (red).
• If you set all of CONTRAST R, G, and B to negative values, the original brightness of the image can’t be
obtained even when you maximize CONTRAST in the IMAGE menu.
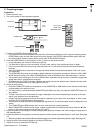
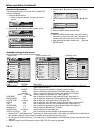
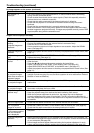
CONTRAST R
COLOR TEMP.-USER
0
CONTRAST G 0
BRIGHTNESS G 0
BRIGHTNESS B 0
CONTRAST B 0
BRIGHTNESS R 0
To adjust the ratio of change in brightness (GAMMA MODE):
You can select a preset gamma mode using the menu.
(See page 24 for menu setting.)
1. Display the IMAGE menu.
2. Select GAMMA MODE by pressing the
or
button.
3. Select your desired gamma mode by pressing the
or
button.
To cancel the menu:
4. Press the MENU button.
To adjust the original ratio of change in brightness (To customize the gamma mode):
To customize (and store) the gamma mode to your preference, carry out the following procedure.
(See page 24 for menu setting.)
1. Select GAMMA MODE in the IMAGE menu.
2. Press the
or
button to select USER1 or USER2 .
3. Press the ENTER button.
4. Press the
or
button to select REFERENCE.
5. Press the
or
button to select basic gamma curve.
• Generally, select the most preferable gamma curve from the preset gamma curve.
6. Press the
or
button to select the desired item.
HIGH : Use to adjust the gradation of the bright scenes.
MID : Use to adjust the gradation of the medium brightness scenes.
LOW : Use to adjust the gradation of the dark scenes.
7. Press the
or
button to adjust the selected item.
8. Repeat steps 6 and 7 for optimum adjustment results.
To cancel the menu:
9. Press the MENU button.
To enable the stored gamma mode:
1. Select USER1 or USER2 by pressing the GAMMA button on the remote control.
• Change in the brightness may be hard to recognize in some images.
Adjusting projected images (continued)
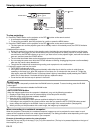
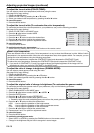
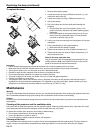
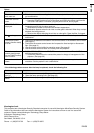
REFERENCE
GAMMA MODE-USER1
VIDEO
0
0
0
HIGH
MID
LOW