


EN-32
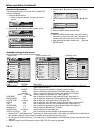
(c)
(a)(b)
(c)
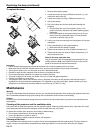
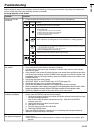
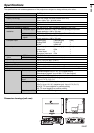
To replace the lamp:
1. Reverse the projector gently.
2. Loosen the screw (a) using a Phillips screwdriver (+), and
remove the lamp cover (b).
3. Loosen the screws (c) using a Phillips screwdriver (+).
4. Pull up the handle.
5. Pull out the lamp box by the handle while holding the
projector.
• Pull the lamp box out of the projector slowly. If it is
pulled out quickly, the lamp may break scattering glass
fragments.
• Do not spill liquid on the removed lamp box or do not
place it near any fl ammable object or where children
can reach to prevent injury or fi re.
6. Load a new lamp box securely into the projector in the right
orientation.
7. Put the handle back to the original position.
• Make sure that the handle is locked.
8. Tighten up the screws (c) using a Phillips screwdriver (+).
9. Tighten up the screw (a) using a Phillips screwdriver (+) to
secure the lamp cover.
Reset of the lamp operation time
Plug in the power cord and reset the lamp operation time by
holding down the
,
, and POWER buttons on the control
panel at the same time about three seconds.
Important:
• Unless these three buttons are pressed at the same time, the lamp operation time isn’t reset.
• Make sure that the STATUS indicator blinks twice and the lamp operation time is reset successfully.
• The projector doesn’t turn on if the lamp cover isn’t attached securely.
• Be sure to reset the lamp operation time whenever you replace the lamp.
• Do not reset the lamp operation time unless you replace the lamp.
• The lamp is fragile. If it is broken, be careful not to cut yourself with glass fragments.
• Contact your dealer for a new lamp.
• This projector uses a lamp that contains mercury. Disposal of the lamp or the projector with the lamp may be
regulated due to environmental considerations. For disposal or recycling information, please contact your local
authorities or the Electronic Industries Alliance: www.eiae.org. (For the U.S. only.)
Maintenance
Warning:
Do not use fl ammable solvents (benzene, thinner, etc.) and fl ammable aerosols when cleaning the projector body and
lens. Flammable substances may ignite causing fi re or breakdown while the lamp is illuminating.
Caution:
Be sure to turn off the lamp and unplug the power cord from the wall outlet before you perform any maintenance on
the projector.
Cleaning of the projector and the ventilation slots
Use a soft cloth to clean the projector and the ventilation grilles. When the grilles become dirty, wipe them with a soft
cloth dampened with diluted mild detergent, and then wipe them with a dry cloth.
To protect the surface of the projector from fading or deteriorating:
• Do not spray insecticide on or inside the projector.
• Do not use benzine or thinner to clean it.
• Do not let rubber or plastic materials contact with projector.
Cleaning of the lens
Use a standard lens-cleaning brush or a piece of lens tissue dampened with lens cleaning fl uid. The lens surface is
fragile. Use only recommended, nonabrasive lens-cleaning materials. Do not touch the lens with your fi ngers.
Replacing the lamp (continued)