Chapter 3 VXIpc 800 Series Configuration and Installation
VXIpc 800 Series User Manual 3-4 © National Instruments Corporation
Configuring the VXIpc 800 Series
This section describes how to configure the following options on the
VXIpc-800:
• VXIbus Slot 0/Non-Slot 0
• VXIbus CLK10 routing
• Trigger input termination
• EEPROM
• Installed system RAM
How to Remove the Metal Enclosure
The VXIpc-800 is housed in a metal enclosure comprised of a top and
bottom cover to improve EMC performance and to provide easy
handling. You must remove the top cover to change many of the switch
and jumper settings. You must also remove the top cover to change the
amount of DRAM installed on the module.
Remove the top cover by removing the 12 screws that attach it to the
module.
VXIbus Slot 0/Non-Slot 0
The VXIpc-800 is configured at the factory to automatically detect if it
is installed in Slot 0 of a VXIbus mainframe. With automatic Slot 0
detection, you can install the module into any VXIbus slot.
You can manually configure the VXIpc-800 for either Slot 0 or
Non-Slot 0 operation by defeating the automatic-detection circuitry.
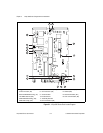
Use the three-position jumper W13 to select automatic Slot 0 detection,
Slot 0, or Non-Slot 0 operation. Figure 3-2 shows these three settings.
Caution: Do not install a device configured for Slot 0 into another slot without
first reconfiguring it to either Non-Slot 0 or automatic configuration.
Neglecting to do this could result in damage to the device, the VXIbus
backplane, or both.
!


