


Reference Guide for the Model RT311 and RT314 Internet Access Gateway Routers
2-8 Setting Up the Hardware
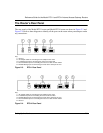
2. Plug the other end into a serial port (such as COM1 or COM2) of your PC.
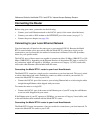
Connecting the Power Adapter
To connect the router to the power adapter:
1. Plug the connector of the power adapter into the 12 VDC adapter outlet on the rear panel of the
router.
2. Plug the other end of the adapter into a standard wall outlet.
3. Verify that the PWR LED on the router is lit.
Verifying Power
After connecting the power adapter to the router and a power source, the router powers on
automatically. Complete the following steps to verify that power is correctly applied to the router:
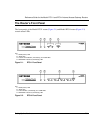
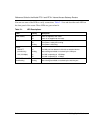
1. When power is first applied, verify that the PWR LED is on.
2. Verify that the TEST LED begins to blink within a few seconds.
3. After approximately 30 seconds, verify that:
a. The TEST LED is not lit.
b. The LOCAL LNK/ACT LEDs are lit for any local ports that are connected.
c. The INTERNET LNK/ACT LED is lit.
If a LNK/ACT LED is lit, a link has been established to the connected device.
4. If a LOCAL port is connected to a 100 Mbps device, verify that the 100 LED is lit.
You are now ready to begin configuration of your network, as described in the following chapter.
Note: You must use a 9-pin to 25-pin adapter if your PC has only a 25-pin port
available.