


9-10 User’s Reference Guide
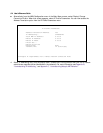
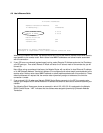
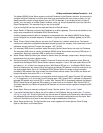
4. Toggle or enter any IP parameters you require and return to the Add Connection Profile screen by pressing
Escape. For more information on NAT, see “Using Network Address Translation,” beginning on page 9-3.
For more information on IP addressing, see Appendix B, “Understanding IP Addressing.”
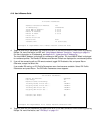
The Local WAN IP Address is displayed for numbered or NAT profiles. The Local WAN IP Mask is displayed
for numbered profiles. The Remote IP Address and Remote IP Mask are displayed for unnumbered profiles.
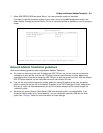
5. If you will be connecting with an IPX remote network, toggle IPX Enabled to Yes, and press Return.
Otherwise, accept the default No.
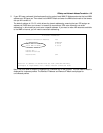
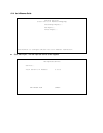
If you enable IPX routing, an IPX Profile Parameters menu item becomes available. Select IPX Profile
Parameters and press Return. The IPX Profile Parameters screen appears.
6. Toggle or enter any IPX parameters you require and return to the Add Connection Profile screen by pressing
Escape. For more information, see “IPX Setup” on page 10-1.
IP Profile Parameters
Address Translation Enabled: Yes
IP Addressing... Unnumbered
Local WAN IP Address: 0.0.0.0
Local WAN IP Mask: 0.0.0.0
Remote IP Address: 0.0.0.0
Remote IP Mask: 0.0.0.0
Filter Set...
Remove Filter Set
Receive RIP: Both
Transmit RIP: v2 (multicast)
Configure IP requirements for a remote network connection here.
IPX Profile Parameters
Remote IPX Network: 00000000
Path Delay: 10
NetBios Packet Forwarding: Off
Incoming Packet Filter Set... <<NONE>>
Outgoing Packet Filter Set... <<NONE>>
Incoming SAP Filter Set... <<NONE>>
Outgoing SAP Filter Set... <<NONE>>
Periodic RIP Timer: 60
Periodic SAP Timer: 60
Configure IPX requirements for a remote network connection here.