


9-20 User’s Reference Guide
Subnet Mask: The subnet mask associated with the destination network.
Next Gateway: The IP address of the router that will be used to reach the destination network.
Priority: An indication of whether the Netopia R5000 Series Router will use the static route when it conflicts
with information received from RIP packets.
Enabled: An indication of whether the static route should be installed in the IP routing table.
To return to the Static Routes screen, press Escape.
AA
AA
dd
dd
dd
dd
ii
ii
nn
nn
gg
gg
aa
aa
ss
ss
tt
tt
aa
aa
tt
tt
ii
ii
cc
cc
rr
rr
oo
oo
uu
uu
tt
tt
ee
ee
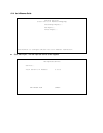
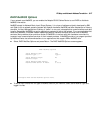
To add a new static route, select Add Static Route in the Static Routes screen. The Add Static Route screen
will appear.
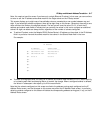
■ To install the static route in the IP routing table, select Static Route Enabled and toggle it to Yes. To
remove the static route from the IP routing table, select Static Route Enabled and toggle it to No.
■ Be sure to read the rules on the installation of static routes in the IP routing table. See “Rules of static
route installation” on page 9-21.
■ Select Destination Network IP Address and enter the network IP address of the destination network.
■ Select Destination Network Subnet Mask and enter the subnet mask used by the destination network.
■ Select Next Gateway IP Address and enter the IP address for the router that the Router will use to reach
the destination network. This router does not necessarily have to be part of the destination network, but it
must at least know where to forward packets destined for that network.
■ Select Route Priority and choose High or Low. High means that the static route takes precedence over RIP
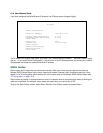
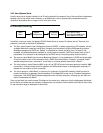
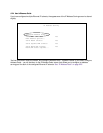
Add Static Route
Static Route Enabled: Yes
Destination Network IP Address: 0.0.0.0
Destination Network Subnet Mask: 0.0.0.0
Next Gateway IP Address: 0.0.0.0
Route Priority... High
Advertise Route Via RIP: No
ADD STATIC ROUTE NOW CANCEL
Configure a new Static Route in this Screen.