


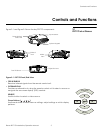

Controls and Functions
6 Planar PD7170 Installation/Operation Manual
PREL
I
MINA
R
Y
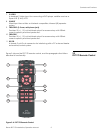
ENTER ( )
Press to select a highlighted menu item or confirm a changed setting.
When no menu is present on-screen, press ENTER to access the motorized lens
focus control. Press ENTER again to access the motorized lens zoom control.
Press ENTER yet again to access the motorized lens shift control.
Use the and buttons to adjust focus, zoom or vertical lens position. Use
the and buttons to adjust horizontal lens position.
MENU
Press this button to show or hide the OSD menus.
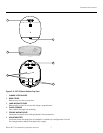
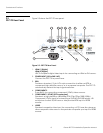
• POWER BUTTON/STATUS LED
Indicates projector status as follows:
• Solid green = AC power present, ready to turn on (lamp not lit)
• Flashing green = lamp is warming up or cooling down; keypad functions
not allowed
• Off = Lamp lit, projector functioning normally
• Alternating green/red = Lamp problem (door open, unable to strike, end
of life), user intervention likely to fix problem
• Flashing red = Over temperature, user intervention (clear vents, turn on AC)
may fix problem
• Solid red = Error that requires servicing (fan fail, Power-on self-test fail etc.)
• EXHAUST VENT
Warm air exits the projector through this vent. Ensure that it is not blocked.
• INTAKE VENT
Internal fans draw cool air into the projector through this vent.
• PROJECTION LENS
The inside of the lens barrel is threaded to accommodate a standard, 72-mm
lens filter. For example, with a smaller screen you can install a neutral-density
filter to reduce the overall light output.
If needed, a light shield accessory is provided with the lens to minimize stray
light emissions. (Use it only when the vertical offset is 50% of the screen height
or greater.) The light shield attaches to the end of the lens (or to the filter, if
used).
• FRONT IR SENSOR
Receives infrared signals from the remote control unit.