


Installation
Planar PD7170 Installation/Operation Manual 31
PREL
I
MINA
R
Y
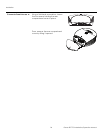
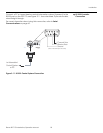
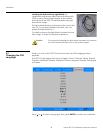
Connecting to AC PowerThe PD7170 ships with various types of AC power cords. Choose the one that is
appropriate to your locale.
Plug the female end of the power cord into the AC receptacle on the rear of
the projector (AC 100V ~ 240V); see
Figure 2-3. Then, connect the other end to
your AC power source.
3.7
Turning on the Power
1. Turn on your source components.
2. Press the ON button on the remote control to turn on the PD7170. The
LED flashes green to indicate that it is warming up.
3. When the projector is ready for use, the LED turns off.
3.8
Lens Adjustments
The PD7170 gives you a great deal of control over the picture size, position and
focus.
FocusTo access the motorized lens focus control, do either of the following:
•Press MENU on the remote control. Select Control from the Main Menu, then
press or to highlight Lens Control. Press or to highlight Focus and
press ENTER.
• When no menu is present on-screen, press ENTER ( ) on the system keypad
or remote control unit.
Then, use the button to focus the projected image nearer or the button to
focus the projected image farther away.
ZoomTo access the motorized lens zoom control, do either of the following:
•Press MENU on the remote control. Select Control from the Main Menu, then
press or to highlight Lens Control. Press or to highlight Zoom and
press ENTER.
• When no menu is present on-screen, press ENTER ( ) on the system keypad
or remote control unit twice.
Then, use the button to make the picture larger (zoom in) or the button to
make the picture smaller (zoom out).
Lens ShiftTo access the motorized lens shift control, do either of the following:
•Press MENU on the remote control. Select Control from the Main Menu, then
press or to highlight Lens Control. Press or to highlight Lens Shift and
press ENTER.
• When no menu is present on-screen, press ENTER ( ) on the system keypad
or remote control unit three times.
Then, use the and buttons to adjust the vertical lens position or the
and buttons to adjust the horizontal lens position.
ON
l