35
3-3 Performing Scanning
3. Creating 3D Data
5
While viewing the preview, make the following settings, then start scanning.
Scanning pitch
Using a fine setting can reproduce details more accurately, but the amount of memory required increases, and
scanning takes longer time.
Scanning area
Specify the minimum area that allows the entire object to be scanned, thereby speeding up scanning time.
Note: When [Set for Each Surface] is selected, you can set the scanning area and scanning pitch individually for
each surface.
(The following settings are only for plane scanning.)
The number of scanning surfaces
You can specify from one to as many as six surfaces. It's a good idea to decide on the number of surfaces to match
the shape of the object.
Scanning angle
Specify the incident angle of the laser for each surface. It may be a good idea to set the preview to Top View. When
the object to be scanned has areas with cavities or voids, specify the angle that allows the laser beam to pass through
the cavities.
6
When scanning ends, the results of scanning appear.
☞ Go to "3-3 Performing Scanning," see "Checking the Scanning Results."
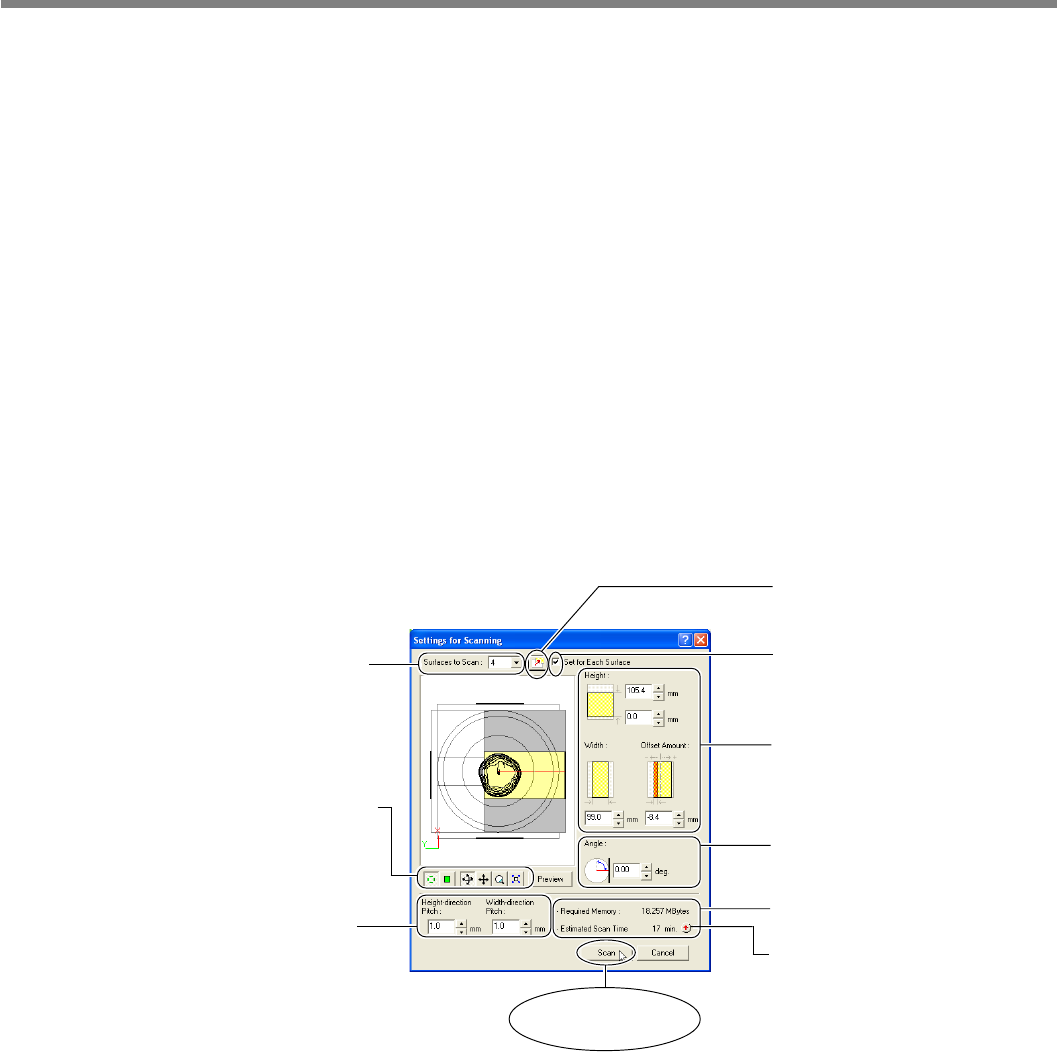
Settings for Scanning dialog box (Plane Scan)
This sets the number of scanning
surfaces (plane scan only).
This changes to the surface
whose scanning angle you want
to set (plane scan only).
This sets the scanning pitch.
During rotary scan, these make
the settings for "Height" and
"Circumference."
This changes the orientation and
perspective for the preview.
These let you switch between
Top View and Front, and expand
or reduce the view.
This sets the scanning area.
During rotary scan, these set the
"Height Direction" and "Circum-
ferential" pitch values.
This sets the scanning angle
(plane scan only).
This displays the amount of
memory that scanning requires.
Clicking the button displays the
estimated scanning time.
Selecting this check box enables
you to set the scanning area and
scanning pitch individually for
each surface.
Clicking this button
starts scanning.


