


28
Part 2 Performing Marking
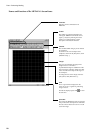
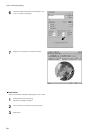
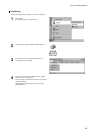
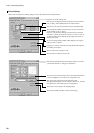
Driver Settings
Refer to this description for making settings for items other than the ones described earlier.
Enter the size of the marking area.
This corrects misalignment of the centerpoint. For more informa-
tion, see Part 5 "The marked location isn't where desired."
This chooses the units of measurement for the width and length.
This expands the marking area (this can be set up to a maximum
of 80 x 80 mm (3-1/8 x 3-1/8 in.).
However, note that when marking is performed in an expanded
area (that is, outside an area of 50 x 50 mm (1-15/16 x 1-15/16 in.
)), then depending on the material and the image, unevenness in
darkness may occur.
This performs adjustment when the marking results are not what
you intended. See Part 5, "Images are unattractive."
This returns the corrected image values to the initial values before
correction (brightness = 0, contrast = 0, and gamma = 0.5).
This chooses the composition of the material to mark.
The optimal marking force for the material to mark is set. To make
fine adjustments in the marking force, click [Details...].
This marks a mirror image of the marking image.
This performs black and white inversion of the image.
To view the image during marking while marking is in progress,
make sure this is selected.
If quality is a priority, switch this off. Note that the time required
for marking is increased.
This saves the driver settings in a file.
This loads driver settings saved in a file.