


PictBridge Printing
Use the following procedure to start PictBridge printing on this printer.
• Memory overflow errors can occur when printing a high-resolution image. If this happens, reduce
the size of the data, and then try the operation again.
• Use the USB cable bundled with your digital camera.
• Make sure your digital camera supports PictBridge.
• Do not disconnect the USB cable while data is being sent. If you do, printing will fail.
1. Confirm that both the printer and the digital camera are turned on.
2. Connect the USB cable to the USB host interface board on the printer and to your digital
camera.
CER501
When the printer recognizes the digital camera as a PictBridge device, "PictBridge Connecting...",
then "Ready" will appear on the printer's control panel.
3. On your digital camera, select the images you want to print, and then specify the printing
conditions.
4. The printer receives settings from the digital camera and starts printing.
• Some digital cameras require settings for manual PictBridge operation. For details, see the manual
provided with the digital camera.
• Some digital cameras require to turn the power switch off for a manual PictBridge operation. For
details, see the manual provided with the digital camera.
• Some digital cameras need to be switched off when connecting to the printer. For details, see the
manual provided with the digital camera.
• For details about how to stop printing data, see p.19 "Canceling a Print Job".
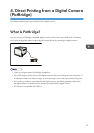
4. Direct Printing from a Digital Camera (PictBridge)
40