


Chapter 1 Quick Start
1-5
1.5 Film Setup
This section will help you setup the SQM-160 to measure a film. Refer to Chapter 2 for
detailed film programming instructions.
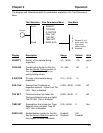
Note: User actions with front panel controls are indicated by a Box. Results shown on
displays, are indicated by a Dashed Box.
Enter Program
Mode
If the Crystal Life display is shown, press Xtal Life to return to
Rate/Thickness mode. Press Program to enter the film setup
menu. Pressing the program switch while in program mode
returns the SQM-160 to normal mode.
Select a Film Turn the Control Knob to select one of the nine possible films,
then press the Control Knob to enter the film parameters
menu.
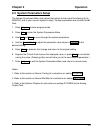
Set Film
Parameters
Turn the Control Knob to set the first film parameter (density).
The parameter value is shown in Display 2. Press the Control
Knob to save the value and move to the next film parameter. If
you press Clear, the film parameter returns to its original value.
Continue to set each parameter. When the last film parameter
is entered, the SQM-160 returns to normal mode. See Chapter
2 for detailed instructions on setting Film Parameters.
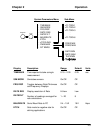
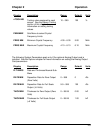
Set System
Parameters
To Enter the system menu, press Program, then Prev. Set
system parameters by turning, then pushing, the Control Knob
as described above. See Chapter 2 for detailed instructions on
setting System Parameters.
If the sensor(s) you selected during film setup are connected to the SQM-160, the
Crystal Status LEDs should be lit. If not, return to the Film Parameters menu and set
the Sensor Average parameter to the desired sensor(s).
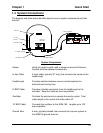
If the Crystal Status LED is flashing, it is most likely that sensor is not properly
connected. Sigma supplies a small test crystal with each oscillator module that can be
used to test sensor connections external to the vacuum chamber. Referring to Section
1.4, disconnect the oscillator from its 6” BNC cable. Attach the test crystal to the
oscillator’s feedthrough connector. The Crystal Status LED will remain lit if the external
sensor connections are correct.
Refer to the Sensor Selection, Frequency Display and Sensor Min/Max sections of
Chapter 2 for information that can assist in troubleshooting sensor problems.