


Chapter 3 Dubbing/Editing
Chapter 3 Dubbing/Editing 39
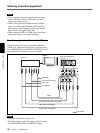
Preparations
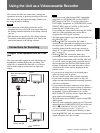
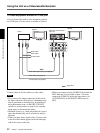
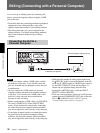
Loading images from a tape to a personal
computer (editing machine)
•When you want to load a tape recorded in the HDV
format into an editing machine in the HDV format,
set [VCR HDV/DV] to [AUTO] or [HDV] (p. 48)
and then set [i.LINK CONV] to [OFF] (p. 49).
•When you want to load a tape recorded in the
DVCAM/DV format into an editing machine in the
DVCAM/DV format, set [VCR HDV/DV] to
[AUTO] or [HDV] (p. 48).
•When you want to load a tape recorded in the HDV
format into an editing machine in the DV format, set
[VCR HDV/DV] to [DV] (p. 48) and then set
[i.LINK CONV] to [DV] (p. 49).
Notes
• The operation may not work with some of your
editing machine software.
Before using the software, confirm that it is
compatible with this unit.
• This unit cannot load a tape recorded in the DVCAM/
DV format into an editing machine after up-
converting this tape into the HDV format.
• If you use a tape recorded both in HVD and DVCAM
(DV) formats when [VCR HDV/DV] is set to
[AUTO], the personal computer (editing machine)
may not be able to recognize the unit or you may not
be able to edit the tape correctly.
• There are restrictions on the video output when you
play back a tape recorded in the HDV format at
various speeds. Refer to the table for “HDV
formatted tape” in “Playing at various speeds” (page
29).
•When you use a tape that was down-converted from
HDV to DV, some conventional DVCAM/DV editing
software may not be able perform the time code
search or this operation could result in an error.
•When you directly record HDV signals that are input
through the i.LINK, a connecting portion between
scenes on the tape will be displayed as a still picture
for approximately 1 second. We recommend
performing digital nonlinear editing for such signals.
• This unit is equipped with a function to down-convert
HDV signals to DV signals and output the signals to
the i.LINK jack. Some software may not be able to
edit this down-converted DV signal correctly. If this
happens, use the following procedure to dub a tape
and then edit the dubbed tape.
Creating a DVCAM compatible tape
Use the menu of this unit to set [i.LINK CONV] to
[ON] and [LOCK MODE] (p. 49) and then perform
DVCAM recording using a recording device that
accepts the DVCAM format.
Creating a general consumer DV compatible
tape
Use the menu of this unit to set [i.LINK CONV] to
[ON] and [UNLOCK MODE] (p. 49) and perform
DV recording using a recording device that accepts
the DV format.
Some editing software can correctly edit even a tape
created in [LOCK MODE]. In that case, select the
[LOCK MODE] if required.
Loading the images of a personal
computer (editing machine) to this unit
• To load images in the HDV format, set [VCR HDV/
DV] to [HDV] (p. 48).
• To load images in the DVCAM (DV) format, set
[VCR HDV/DV] to [DV] (page 48).