


Chapter 4 Adjusting and Setting Through Menus
48 Chapter 4 Adjusting and Setting Through Menus
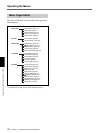
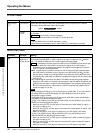
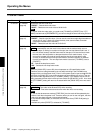
LCD SET menu
Icon/Menu Submenu Setting
LCD SET
LCD COLOR
LCD BL
LEVEL
Adjusts the color density of the liquid crystal display when you press the f/F buttons.
This setting will not affect the video to be recorded.
Lighter Darker
Adjusts the brightness of the LCD screen backlight. This setting will not affect the video to
be recorded.
NORMAL : Normal setting (normal brightness)
BRIGHT : Select this when you feel the LCD screen to be dim.
Notes
• You can set this menu only when the battery is used.
• When the unit is connected to the AC outlet, [BRIGHT] is automatically selected.
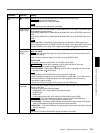
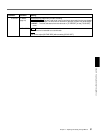
IN/OUT REC menu
Icon/Menu Submenu Setting
IN/OUT REC
VCR HDV/DV
(page 25, 31,
32, 35, 38, 39)
Normally, set this menu to [AUTO]. Select this menu when you want to limit the output
format during tape playback or limit the signals to be input or output from the
HDV/DV
jack. This setting will affect the LCD monitor output and analog output.
AUTO : Automatically switches signals to HDV format or DVCAM/DV format during tape
playback. When the i.LINK cable is connected, the signals in the HDV format or
DVCAM/DV format is switched automatically and signals from the HDV/DV jack are
input or output for recording/playback.
HDV : Outputs signals of portions recorded in HDV format during tape playback. When
the i.LINK cable is connected, only the signals in the HDV format from the
HDV/DV
jack are input or output for recording/playback. Also select this setting when the unit is
connected to the i.LINK cable to a personal computer that supports the HDV format
(see
page 25, 32)
.
DV : Outputs signals of portions recorded in DVCAM/DV format during tape playback.
When the i.LINK cable is connected, only the signals in the DVCAM/DV format from the
HDV/DV jack are input or output for recording/playback. Also select this setting when
the unit is connected to the i.LINK cable to a personal computer that supports the DV
format
(see page 31, 32, 39)
.
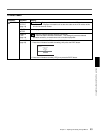
Notes
• Before changing the setting, be sure to disconnect the i.LINK cable. If an i.LINK cable is
connected when you change the setting, the video equipment may not be able to
recognize the signal correctly.
• If you select [AUTO], the screen turns off temporarily when HDV signals are switched to
DVCAM/DV. The video and audio also stops.
• If [HDVtDV CONV] is set to [ON] and [AUDIO LOCK] of [i.LINK CONV] is set to [LOCK
MODE], the following signals are output.
– When you set to [AUTO], an HDV signal is converted to an audio-locked DV signal; a
DV signal is output as it is.
– When you set to [HDV], an HDV signal is converted to an audio-locked DV signal; a DV
signal is not output.
– When you set to [DV], a DV signal is output as it is; an HDV signal is not output.
• If [HDVtDV CONV] is set to [ON] and [AUDIO LOCK] of [i.LINK CONV] is set to
[UNLOCK MODE], the following signals are output.
– When you set to [AUTO], an HDV signal is converted to an audio-unlocked DV signal; a
DV signal is output as it is.
– When you set to [HDV], an HDV signal is converted to an audio-unlocked DV signal; a
DV signal is not output.
– When you set to [DV], a DV signal is output as it is; an HDV signal is not output.
Operating the Menus