


15
GB
Setting Up
Setting Up
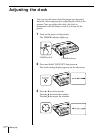
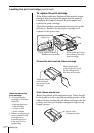
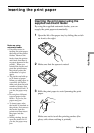
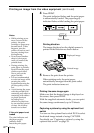
Inserting the print paper
Spacer
Inserting the print paper using the
supplied automatic feeder
By using the supplied automatic feeder, you can
supply the print paper automatically.
1 Open the lid of the paper tray by sliding the switch
on front to the right.
2 Make sure that the spacer is raised.
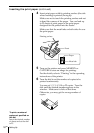
3 Riffle the print paper to avoid jamming the print
paper.
Make sure not to touch the printing surface (the
glossy side where nothing is printed).
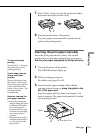
Notes on using
automatic feeder
• If trouble occurs in
feeding the print paper,
the lamp on the printer
flashes. Remove the
feeder from the printer
and check that there is
no paper jammed in the
printer. When you
reinstall the feeder and
press the print button,
the printer prints the
set number of copies
again.
• The feeder can hold up
to 25 sheets of paper.
When you add paper to
a partially full feeder,
make sure that the total
number of sheets does
not exceed this limit. If
you do, the paper may
jam.
• Do not place different
types of paper in the
feeder. If you do, the
paper may jam.
• To insert paper after
the feeder is attached to
the printer, first remove
the feeder from the
printer and then insert
the paper into the
feeder.
• While printing, do not
open the feeder lid. If
you do, the paper may
jam.