


– 17 –
3. Press the X key once more.
4. Press the x key to quit the manual mode, and activate the
test mode (display check mode).
• Troubleshooting method of NV reset
Executing the NV reset on the set having the microcomputer version
1.000 causes the adjusted values of item numbers 721, 722, and
757 to be cleared.
In executing the NV reset on the set having the microcomputer
version 1.000, follow the steps given below.
This operation is not necessary for the set having the
microcomputer version 1.100 or later.
1. Select the manual mode of the test mode (see page 13).
2. Set item number 757 and record the adjusted value.
3. Set item number 721 and record the adjusted value.
4. Set item number 722 and record the adjusted value.
5. Execute the NV reset.
6. Set item number 757, and change the value to the adjusted
value recorded previously with [VOL +] key or [VOL --] key,
and then press the X key.
7. Set item number 721, and change the value to the adjusted
value recorded previously with [VOL +] key or [VOL --] key,
and then press the
X key.
8. Set item number 722, and change the value to the adjusted
value recorded previously with [VOL +] key or [VOL --] key,
and then press the X key.
Power Supply Manual Adjustment
• Adjustment sequence
Adjustment must be done with the following steps.
1. Vc PWM Duty (L) adjustment (item number: 762)
r
2. Vrem PWM Duty (L) adjsutment (item number: 764)
r
3. Vc PWM Duty (H) adjustment (item number: 765)
r
4. Vrem PWM Duty (H) adjustment (item number: 766)
• Setting method of power supply manual adjustment
1. Select the manual mode of the test mode, and set item number
036 (see page 13).
2. Press the
X key.
(The item number changes to 762 when X key is pressed)
NV Reset
Caution: On the set having the microcomputer version 1.000, the
NV reset failure will occur.
Therefore, in executing the NV reset during electrical
adjustment, follow the troubleshooting method of NV
reset to perform the NV reset.
• Setting method of NV reset
1. Select the manual mode of the test mode, and set item number
021NV Reset (see page 13).
2. Press the X key.
SECTION 5
ELECTRICAL ADJUSTMENTS
Outline
• In this set, automatic adjustment of CD and MO can be per-
formed by entering the test mode (see page 12).
However, before starting automatic adjustment, the memory clear
and power supply/charging adjustments must be performed in
the manual mode.
• A key having no particular description in the text, indicates a
remote commander key.
Precautions for Adjustment
1. Adjustment must be done in the test mode only.
After adjusting, release the test mode.
2. Use the following tools and measuring instruments.
• Test CD disc TDYS-1
(Part No. : 4-963-646-01)
• Recorded MO disc PTDM-1
(Part No. : J-2501-054-A)
Available SONY MO disc (recorded)
• Digital voltmeter
3. Unless specified otherwise, supply DC 1.5V from the battery
terminal.
4. Switch position
AVLS switch ................................................ NORM
DIGITAL SOUND PRESET switch ........... OFF
HOLD switch ............................................... OFF
Adjustment Sequence
Adjustment must be done with the following steps.
1. NV Reset (Memory clear)
r
2. Power Supply Manual Adjustment Manual Mode
r
3. Charging Manual Adjustment
r
4. CD Overall Adjustment
r Overall Mode
5. MO Overall Adjustment
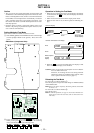
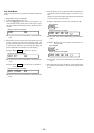
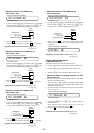
021 ResNV CC
Remote commander LCD display
021 ResOK?
Remote Commander LCD display
021 Res***
021 Reset!
Remote commander LCD display
NV reset (after several seconds)
036 Power CC
Remote commander LCD display