


Section 2: Installing the PCS Connection Card
2A: Installation on Notebook PCs 23
Inserting and Removing the PCS Connection Card
Inserting the PCS Connection Card
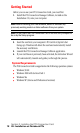
Before you insert the PCS Connection Card, you must first install the
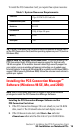
Wireless Connection Manager Software. Once you have completed the
installation procedure, you may insert your card into your computer’s PC
Card slot. The Sprint label should be facing up, and the 68-pin
connector, located at the end of the card, should be inserted directly into
the computer’s PC Card slot.
Note: The PCS Connection Card should fit snugly, but you should be able to
insert or remove it easily from your computer’s PC Card slot.
When you insert the card, the following should occur:
ᮣ
If sound effects are enabled, the PC beeps.
ᮣ
The PC Card icon appears in the status area, if it is not already
displayed for another card (and unless the feature has been
disabled).
ᮣ
The PCS Connection Manager Software launches (unless the
auto-launch feature has been disabled).
The card is powered as soon as you insert it.
Removing the PCS Connection Card
To remove the card:
1.
Close the PCS Connection Manager program if it is open.
2.
Click the PC Card icon in the status area to display the option to stop
the card.
3.
Click “Stop PCS Connection Card Parent” (Windows 98 SE, 2000, or
Me) or “Safely remove PCS Connection Card Parent” (Windows XP).
4.
If a dialog box appears notifying you that it is safe to remove the
card, click
OK
.
5.
Use the ejector to remove the card from the slot.