


1 SpeedTouch™ Installation
E-DOC-CTC-20030814-0001 v1.0
10
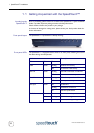
Turn on the
SpeedTouch™
Once all previous steps are completed, you can turn the SpeedTouch™ on (I) with the
power switch.
The SpeedTouch™ is ready for service as soon as the start-up procedures are
completed, the Power On Self Test (POST) is passed and both Power/Alarm and Line
Sync LEDs on the front panel are constantly lit green.
Note You can follow the start-up procedure progress on the PWR/Alarm LED.
See “ Front panel LEDs” on page 6 for more information.
For troubleshooting startup failures, see “7.6 Troubleshooting” on page 91.
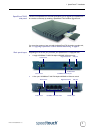
Local networking setup The SpeedTouch™ offers two local networking solutions:
• Wired Ethernet
The SpeedTouch™'s Ethernet port(s) on the back panel allow(s) you to connect
the SpeedTouch™ to an existing 10 or 100Base-T Ethernet network or one (or
more) computer(s) with installed Ethernet card.
• In case of a single Ethernet port SpeedTouch™, you will need an external
hub or switch to connect multiple computers.
• In case of a SpeedTouch™ switch, you can create a local Ethernet network
of up to four devices, without needing extra networking devices.
Note If an external hub or switch is used for wired Ethernet networking,
please follow the installation instructions supplied with the hub for
connections and Ethernet cabling.
• Wireless Ethernet
The SpeedTouch™ wireless access point allows multiple computers to connect to
your local network over the SpeedTouch™ Wireless LAN environment.
To be able to connect the computers, make sure that:
• A Wireless Ethernet client adapter (WLAN client) is installed on each of the
computers you want to connect via the Wireless Ethernet.
• In case you purchased a SpeedTouch™545, the wireless upgrade card is
installed as described in “7.1 Upgrading a SpeedTouch™545 for Wireless
Networking” on page 74.
For more information on how to proceed for associating WLAN clients, see
“4 Wireless Connectivity” on page 41.
Internet connection
setup
To continue with preparing the SpeedTouch™ for Internet connectivity, see
“1.3 SpeedTouch™ Configuration Setup” on page 11.