


13
INSTALLING THE
PRINTER DRIVER
(Windows)
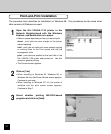
Installing the Printer Driver for SMB Printing
PREPARATIONS:
Before installing the printer driver to use SMB printing, please make sure of the following:
• If a previous version of the printer driver has been installed on the system, it must be removed.
(See instructions on this in the User Software Installation Guide.)
• The GA-1120/GA-1130 printer is connected to the network and turned on.
• The TCP/IP setting is completed correctly.
• The Windows Printing is completed correctly.
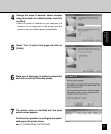
INSTALLING THE PRINTER DRIVER
The procedure to Install the printer driver to use SMB printing is different depending on the version of
the Windows. Also the procedure is different which printer controller, GA-1120 or GA-1130, is installed
on your copier.
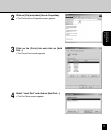
When the GA-1120 is installed:
When installing the printer on Windows 95, Windows 98, and Windows Me, the GA-1120 supports the
Point-and-Print installation. In Point-and-Print installation, you can download the printer driver from the
GA-1120 print server.
P.14 “Point-and-Print Installation”
When using the printer on Windows NT 4.0, Windows 2000, and Windows XP, configure the network
port first, and install the printer driver from the User Software CD-ROM since the GA-1120 does not
support the Point-and-Print installation.
P.16 “Non Point-and-Print Installation”
When the GA-1130 is installed:
When installing the printer on Windows 95, Windows 98, Windows Me, and Windows NT 4.0, the GA-
1130 supports the Point-and-Print installation. In Point-and-Print installation, you can download the
printer driver from the GA-1130 print server.
P.14 “Point-and-Print Installation”
When using the printer on Windows 2000, and Windows XP, configure the network port first, and install
the printer driver from the User Software CD-ROM since the GA-1130 does not support the Point-and-
Print installation.
P.16 “Non Point-and-Print Installation”