


6-2 Advanced adjustments
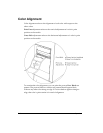
Printhead Tangency Alignment
The proper alignment of the printhead over the platen roller produces
optimum transfer of ribbon to the media. Although this mechanical
adjustment is a factory setting, there are situations where a slight
repositioning of the platen support strut will optimize print quality on
different media types and thicknesses.
Tools Needed:
7” long, #2 Phillips Screwdriver
3/16” Open End Wrench or Adjustable Wrench
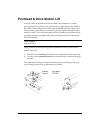
1 Loosen the two outside screws on either side of the platen shaft end
plate.
2 Insert the #2 screwdriver through the hole in the frame plate just to the
right of the endplate.
3 Loosen the screw on the main plate located inline with the hole.
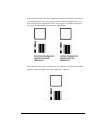
4 Print a block image the width of the label with a saturated color fill of the
print station to be adjusted (i.e. pure Cyan, Magenta, Yellow, Black, or
Spot Color).
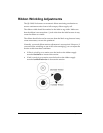
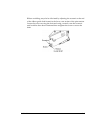
Print several labels and rotate the shaft protruding out of the frame plate
just under the station printing the image. Turn the knob with the 3/16”
wrench until the printed blocks appear fully saturated with no lines,
breakup, or white pinholes throughout the fill.
5 Press the PRINT/PAUSE key to pause printing.
6 Tighten the three screws at the main plate and at the platen shaft end
plate.
7 Press the PRINT/PAUSE key to resume printing a few more labels to
verify that the alignment has been optimized.