


QLS-8100 Xe 7-7
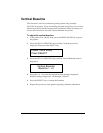
1 Remove the AC power cord from the outlet, and then disconnect the
power cord from the rear of the printer.
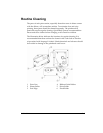
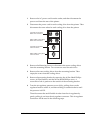
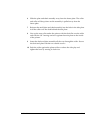
2 Disconnect the power cord for each cooling drive from the printer. Then
disconnect the water tubes for each cooling drive from the printer.
Top Water Cooling Drive
Water Tube Connectors
Top Water Cooling Drive
Power Connector
Bottom Water Cooling Drive
Power Connector
Bottom Water Cooling Drive
Water Tube Connectors
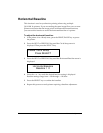
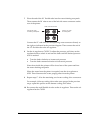
3 Remove the Mounting Screws to disconnect the water cooling drives
from the mounting bracket. Two screws are used for each drive.
4 Remove the water cooling drives from the mounting bracket. Then
empty the water from the cooling drives.
5 Remove the mounting bracket by removing the #6 Pan Head Phillips
screws, #6 Flat Washers, and the #6 Flat Head Phillips screw. A
screwdriver hole is present on the outside of the mounting bracket.
6 Turn the air regulator pressure to zero (0) by pulling down on the
regulator knob to unlock it, and then turning it counterclockwise until
the pressure is 0 PSI.
Then disconnect the small flexible air tube from the air regulator by
gently pulling it out from the air regulator connector. This air regulator
connection will be used in the following steps.