


Scanning
Xerox
®
WorkCentre
®
4265 Multifunction Printer 109
User Guide
Sending a Scanned Image to a Destination
Before scanning to a destination, configure the destination folders on the server or share the folder on a
personal computer. In addition, you must have at least one Scan To Destination in the address book. If
Scan To Destination properties are not properly configured, the Scan To icon appears grayed out on the
touch screen.
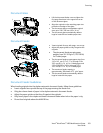
To scan an image and send it to a destination:
1. Load the original on the document glass or in the document feeder.
2. At the printer control panel, press Clear All, then press Services Home.
3. Touch Scan To > Scan Contacts.
4. Select an option.
5. Select the desired name from the list, then touch OK.
6. Change scan settings as needed.
7. Press the green Start button.
For details, see Adjusting Scanning Settings on page 104.