


Chapter 34 VRRP
GS-4012F/4024 User’s Guide
270
34.3.2 VRRP Parameters
This section describes the VRRP parameters.
34.3.2.1 Advertisement Interval
The master router sends out Hello messages to let the other backup routers know that it is still
up and running. The time interval between sending the Hello messages is the advertisement
interval. By default, a Hello message is sent out every second.
If the backup routers do not receive a Hello message from the master router after this interval
expires, it is assumed that the master router is down. Then the backup router with the highest
priority becomes the master router.
" All routers participating in the virtual router must use the same advertisement
interval.
34.3.2.2 Priority
Configure the priority level (1 to 254) to set which backup router to take over in case the
master router goes down. The backup router with the highest priority will take over. The
priority of the VRRP router that owns the IP address(es) associated with the virtual router is
255.
34.3.2.3 Preempt Mode
If the master router is unavailable, a backup router assumes the role of the master router.
However, when another backup router with a higher priority joins the network, it will preempt
the lower priority backup router that is the master. Disable preempt mode to prevent this from
happening.
By default, a layer 3 device with the same IP address as the virtual router will become the
master router regardless of the preempt mode.
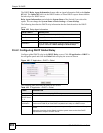
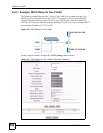
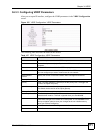
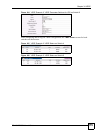
Table 106 VRRP Configuration: IP Interface
LABEL DESCRIPTION
Index This field displays the index number of an entry.
Network This field displays the IP address and number of subnet mask bit of an IP domain.
Authentication Select None to disable authentication. This is the default setting.
Select Simple to use a simple password to authenticate VRRP packet exchanges on
this interface.
Key When you select Simple in the Authentication field, enter a password key (up to
eight printable ASCII character long) in this field.
Apply Click Apply to save your changes to the Switch’s run-time memory. The Switch loses
these changes if it is turned off or loses power, so use the Save link on the top
navigation panel to save your changes to the non-volatile memory when you are done
configuring.
Cancel Click Cancel to discard all changes made in this table.