


DUA1640-5AAA02
3-6
C
HAPTER
3: U
SING
THE
PS H
UB
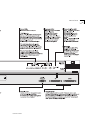
Positioning the
PS Hub
When installing your PS Hub, ensure that:
■
It is accessible and cables can be connected easily.
■
It is out of direct sunlight and away from sources of heat.
■
Cabling is away from power lines, fluorescent lighting fixtures, and
sources of electrical noise such as radios, transmitters and
broadband amplifiers.
■
Water or moisture cannot enter the case of the unit.
■
Air flow around the unit and through the vents in the side of the
case is not restricted. We recommend you provide a minimum of
25.4mm (1in.) clearance.
■
Free standing hubs are not stacked more than six high, and that
cables are supported so that they cannot pull the stack over.
■
No objects are placed on top of any hub or stack.
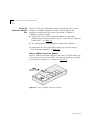
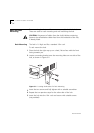
Using the Rubber
Feet
Four standard height and two reduced height self-adhesive rubber feet
are supplied with the hub.
Do not apply the feet if you intend to rack or wall mount the hub.
Usage of the feet depends on where the PS Hub is placed:
■
If the hub is going to be placed on top of a flat surface or another
PS Hub, use the four standard height feet.
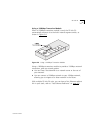
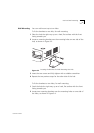
■
If the hub is going to be placed on top of a LinkBuilder
®
FMS™ II
hub or other SuperStack II unit, use two standard height feet
towards the front, and the two reduced height feet towards the
rear.
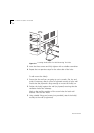
CAUTION: If the hub is to be part of a free standing stack, apply the
feet to each marked corner area on the underside of the hub. If the
free standing stack contains different size hubs, ensure that the larger
hubs are at the bottom of the stack.