


Wireless Networking 77
Gateway connection to the Internet. Also, other computer users will lose
their network connections whilst this process is taking place, so choose a
time when this would be convenient.
1 Remove power from the Gateway.
2 Disconnect all your computers and the cable/DSL modem from the
Gateway.
3 Using a straight through Ethernet cable, connect the Ethernet Cable/DSL
port on the rear of the Gateway to any one of the LAN ports.
4 Re-apply power to the Gateway. The Alert LED will flash as the Gateway
starts up, and after approximately 30 seconds will start to flash more
slowly (typically 2 seconds on, 2 seconds off). Once the Alert LED has
started to flash slowly, remove power from the Gateway.
5 Remove the cable connecting the Cable/DSL port to the LAN port, and
reconnect one of your computers to one of the Gateway LAN ports.
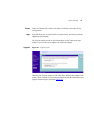
6 Re-apply power to the Gateway, and when the start-up sequence has
completed, browse to:
http://192.168.1.1
and run the configuration wizard. You may need to restart your computer
before you attempt this.
7 When the configuration wizard has completed, you may reconnect your
network as it was before.
Wireless
Networking
This section applies to the Wireless Cable/DSL Gateway only.
■ Ensure that you have a Wi-fi certified 802.11b wireless adapter for
each wireless computer, and that it is correctly installed and
configured. Verify that each Wireless computer has either Windows
95 or higher or MAC OS 8.5 or higher.
■ Verify that your wireless computers are configured to work in
Infrastructure mode and not Ad Hoc mode. The Gateway contains an
Access Point that is designed to operate in Infrastructure mode. Ad
Hoc mode is not supported by the Gateway.
■ Check the status of the Gateway Wireless LED, it should be lit if
wireless is enabled and will flash when there is wireless activity. If not
lit go to “
Wireless Settings” on page 46 and enable wireless
networking.
■ Ensure that the TCP/IP settings for all devices are correct.