


TRACER 5045 System Manual Section 6 Troubleshooting Guide
612805045L1-1A © 2003 ADTRAN, Inc. 55
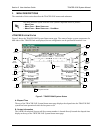
9. Examine the RF LOW LED on the front panel of each TRACER 5045. If this LED is illuminated,
then the TRACER 5045 is receiving a relatively weak signal; however, if the
RF DOWN LED is
not illuminated, then the received signal is being suitably processed by the TRACER 5045 system.
If you are receiving a weak signal (
RF LOW is ON), please verify that the weak signal is not being
caused by a faulty cable, an insufficiently tightened cable, or some other installation-related
problem. Also, make sure an unreasonably large attenuation value has not been selected if you are
using an attenuator on a workbench setup.
Use the tables in Section 2, Microwave Path Engineering Basics, of this manual to select the
proper free-space attenuation value (in dB) based on the estimated length of the microwave path.
Remember to subtract both antenna gains (local and remote) from the attenuator setting.
10. Connect a computer (or ethernet test equipment) to the TRACER 5045 ethernet interfaces.
Perform a “ping” from one test station across the wireless link to another test station connected to
the remote TRACER 5045. This will verify the data path between the test equipment and the
TRACER 5045 unit.
Installing/Configuring Ethernet Hardware
1. If possible, attach any or all of the intended ethernet hardware to the TRACER 5045 units using
the same workbench setup. This step offers the perfect opportunity to configure your ethernet
hardware for proper functioning with the TRACER hardware.
2. To significantly reduce the probability of an unsuccessful field installation, resolve any remaining
ethernet equipment-to-TRACER 5045 configuration issues before field installation.