


Chapter 2 System Setup
19
2.5 Installing System Software
Recent releases of operating systems from major vendors include setup
programs which load automatically and guide you through hard disk
preparation and operating system installation. The guidelines below will
help you determine the steps necessary to install your operating system on
the panel PC hard drive.
Note: Some distributors and system integrators may have
already pre-installed system software prior to shipment
of your panel PC.
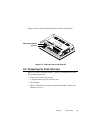
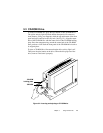
If required, insert your operating system's installation or setup diskette
into the diskette drive until the release button pops out. (See Fig. 3-1.)
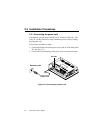
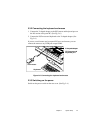
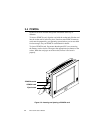
The BIOS of the panel PC supports system boot-up directly from the
CD-ROM drive. You may also insert your system installation CD-ROM
into the CD-ROM drive. (See Fig. 3-2.) Refer to Chapter 9 - BIOS Setup
if you wish to change the BIOS settings.
Power on your panel PC or reset the system by pressing the
"Ctrl"+"Alt"+"Del" keys simultaneously. The panel PC will automatically
load the operating system from the diskette or CD-ROM.
If you are presented with the opening screen of a setup or installation
program, follow the instructions on screen. The setup program will guide
you through preparation of your hard drive, and installation of the
operating system.
If you are presented with an operating system command prompt, such as
A:\>, then you must partition and format your hard drive, and manually
copy the operating system files to it. Refer to your operating system user's
manual for instructions on partitioning and formatting a hard drive.
2.6 Installing the Drivers
After installing your system software, you will be able to set up the
Ethernet, SVGA, audio, and touchscreen functions. All the drivers except
the CD-ROM drive driver are stored in a CD-ROM disc entitled "Drivers
and Utilities". The CD-ROM drive driver is stored in a floppy disk. Both
the CD-ROM and the floppy disk can be found in your accessory box.