


Using the Panel PC
29
Chapter 3
3.7 Parallel Port
The panel PC supports the latest EPP and ECP parallel port protocols for
improved performance and versatility with compatible printers or other
devices.
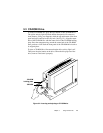
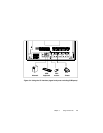
To connect the panel PC to a printer or other devices:
1. Be sure both the panel PC and the printer/devices are turned off.
2. Connect the 25-pin male connector of the printer cable to the 25-pin
female port on the panel PC labelled "parallel port".
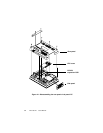
3. If necessary, attach the other end of your printer cable to your printer,
and fasten any retaining screws. A typical parallel printer connection is
illustrated in Fig. 3-4.
4. Turn on the printer and any other peripheral devices you may have
connected to the panel PC, and then turn on the panel PC.
5. If necessary, run the panel PC's BIOS setup program to configure the
parallel port to respond as required by your printer and software
operating environment.
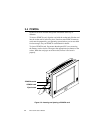
3.8 Serial COM Ports
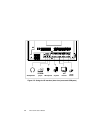
There are four serial COM ports on the bottom of the rear cover. You can
easily attach a serial device to the panel PC, such as an external modem or
mouse. Follow these instructions:
1. Be sure the panel PC and any other peripherial devices you may have
connected to the panel PC are turned off.
2. Attach the interface cable of the serial device to the panel PC's serial
port. (See Fig. 3-5.) If necessary, attach the other end of the interface
cable to your serial device. Fasten any retaining screws.
3. Turn on any other peripheral devices you may have connected to the
panel PC, and then turn on the panel PC.
4. Refer to the manual(s) which accompanied your serial device(s) for
instructions on configuring your operating environment to recognize
the device(s).
5. Run the BIOS setup program and configure the jumper settings to
change the mode of the COM ports. (See Section 5.3.)