


Chapter 4 Hardware Installation and Upgrading
41
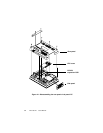
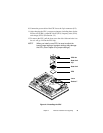
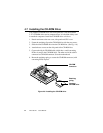
4.6 Installing the Floppy Disk Drive (FDD)
Installation of a floppy disk drive is similar to that for a hard disk drive.
The metal plate for holding the FDD is on the left side of the shielding
case. The 26-pin yellow FPC cable is for connecting the FDD. Only 3.5"
floppy disk drives (720 KB and 1.44 MB) can be attached to the metal
plate.
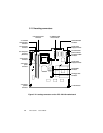
1. Detach and remove the rear cover and side panel.
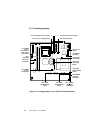
2. There is a metal plate for holding the FDD on the right side of the
shielding case. (See Fig. 4-5.) Unscrew the two screws on the upper
side of the metal plate.
3. Push the metal plate to the right and remove it from the two lugs of the
shielding case.
4. Place the FDD on the metal plate. Tighten the four smaller screws
located on each side of the metal plate.
5. Connect the yellow FDD cable (26-pin to 26-pin) which is next to the
metal plate of the FDD. The other end of the FDD cable is connected
to connector J8 on the PC board.
6. Attach the two screws of the metal plate to the original hole.
Figure 4-5: Installing the FDD
Metal plate
3.5" floppy drive