Chapter 2: Installation 7
6. If you configure the switch using the console menu interface, connect a terminal or PC running
terminal emulation software to the SETUP port on the back panel of the switch using the
supplied cable. The terminal should be set to 9600 bits per second (bps), 8 bits, 1 stop bit, no
parity and no flow control. Otherwise, proceed to the next step.
7. Turn on each target device and then turn on the KVM switch. After approximately one minute,
the KVM switch completes initialization and opens the OSD graphical user interface Free tag
on the local port monitor.
8. Use the web interface or the Network Access Software to configure the KVM switch.
Connecting a KVM server module to each target device
To connect a KVM server module to a target device:
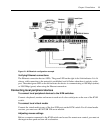
1. Attach the color-coded connectors of the KVM server module to the keyboard, monitor and
mouse ports on the first target device you connect to the KVM switch.
2. Attach one end of the CAT5 cable to the RJ-45 connector on the KVM server module.
3. Connect the other end of the CAT5 cable to a target device interface port on the rear of the
KVM switch.
Repeat steps 1 to 3 for all target devices to be attached.
WARNING: To reduce the risk of electric shock or damage to your equipment:
- Do not disable the power cord grounding plug. The grounding plug is an important safety feature.
- Plug the power cord into a grounded (earthed) outlet that is easily accessible at all times.
- Disconnect the power from the switch by unplugging the power cord from either the electrical outlet or the
KVM switch.
- The AC inlet is the main power disconnect.
Setting up the network
The KVM switch and KVM server modules use IP addresses to uniquely identify the KVM switch
and target devices. The KVM switch supports both Dynamic Host Configuration Protocol (DHCP)
and static IP addressing. To avoid confusion, reserve IP addresses for each KVM switch and ensure
the IP addresses remain static while the KVM switch is connected to the network. For additional
information on setting up the KVM switch using the Network Access Software, and for information
on how the KVM switch uses TCP/IP, see
See “Network Access Software” on page 35..


