


Doing a normal installation of system software
Follow the steps in this section to do what is commonly called a “normal”
installation of system software.
If you’re installing system software on a hard disk for the first time, make sure
that your hard disk has been initialized, a process that prepares the disk to
store information. (You use the Drive Setup program on the Disk Tools disk to
initialize a hard disk.)
To do a normal installation, follow these steps:
1 Start up your computer from the
Disk Tools
disk.
2 Find and open the Disk First Aid icon.
After Disk First Aid starts, follow the instructions on the screen. Disk First
Aid checks your hard disk for any problems.
3When Disk First Aid has finished checking your hard disk, choose Quit from the
File menu.
4 Open the Drive Setup program.
You use the Drive Setup program to update your hard disk.
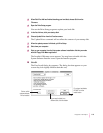
5In the list of drives, click your startup disk.
6Pull down the Functions menu and choose Update Driver.
7When the update process is finished, quit Drive Setup.
8Shut down your computer.
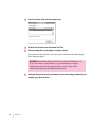
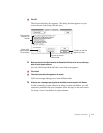
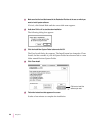
9 Start up your computer from the first system software installation disk you made with
Floppy Disk Maker.
The Installer’s Welcome screen appears. You may have to double-click the
System Software Installer icon to open the Installer program.
116
Chapter 8