


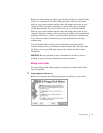

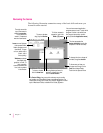

4Click Add.
The folder (or individual disk) appears in the list to the right under “Disk
images to be copied.”
Repeat steps 3 and 4 until all the software you want to copy appears in the list
to the right. The total number of disks you’ll need appears above the list in
the right of the window.
If you want to remove an item from the list on the right, click the item to
select it and click Remove.
5Click Copy.
Follow the instructions on the screen. Remember to label the disks as you
make them.
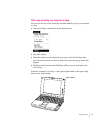
What’s next?
Yo u’ve now finished setting up your Macintosh PowerBook. Continue with
one of the following steps:
m If you are new to the Macintosh, turn to the next section, “Learning the
Basics.”
m If you are an experienced Macintosh user, turn to Chapter 2, “Getting
Help,” to learn about Macintosh Guide, your main source of information
when you’re working with the Macintosh computer.
m If you have additional equipment to connect to your computer, see
Chapter 4, “Connecting Additional Equipment,” for instructions. (If you
are a new Macintosh user, you should complete “Learning the Basics”
before connecting additional equipment.)
m If you have application programs that you want to install on your computer,
see Chapter 5, “Installing and Using Application Programs,” for
instructions. (If you are a new Macintosh user, you should complete
“Learning the Basics” before installing application programs.)
IMPORTANT
If you need to turn off your computer at any point, read the
instructions in “Turning the Computer Off” later in this chapter to learn the
correct procedure for turning off your Macintosh PowerBook computer.
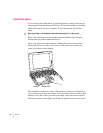
15
Getting Started