


Setting Up NetInfo Hierarchies
49
5
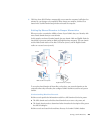
Use nidomain’s list command to verify that you now have three domains on server 1:
[server1:~] root# nidomain -l
tag=network udp=768 tcp=769
tag=local udp=766 tcp=767
tag=myschool udp=854 tcp=855
You can also list all the netinfod processes running on server1. There is one for each domain:
[server1:~] root# ps aux | grep netinfod
root 164 0.0 0.4 1784 504 ?? S 0:00.47
netinfod local (master)
root 165 0.0 0.3 2684 452 ?? S 0:00.87
netinfod myschool (master)
root 166 0.0 0.3 1784 424 ?? S 0:00.30
netinfod network (master)
root 272 0.0 0.1 5708 196 std RV 0:00.00
grep netinfod
6
When you create a new domain using niutil, it has only two directories in its database: / and
machines. Add additional directories to the root domain’s database:
[server1:~] root# niutil -create -t server1/myschool /users
[server1:~] root# niutil -create -t server1/myschool /groups
[server1:~] root# niutil -create -t server1/myschool /aliases
[server1:~] root# niutil -create -t server1/myschool /mounts
[server1:~] root# niutil -create -t server1/myschool /printers
7
Restart server1 and create a root and an administrator account in the root domain so that it
can be modified from anywhere on the network:
a
Open Server Admin, click the General tab, then click Users & Groups.
b
Choose New User and select /NetInfo/root from the pop-up menu. Enter the information
that describes the root user, including a short name of “root” and a UID and primary
group ID of 0. Then click Save.
c
Repeat step 7b to create a user who is an administrator.