


50
Chapter 3
Step 3: Create the future English domain
In this step, you create a root domain on server2 using NetInfo Domain Setup. Later, this
domain will become the English domain.
1
Ensure that server2 has a valid DNS entry in your DNS server.
2
Log in as root to server2.
3
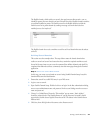
Open NetInfo Domain Setup. Click the lock icon to log in. In the first authentication dialog,
enter a server administrator name and password. In the second dialog, enter the root user
name and password.
4
Choose “is a NetInfo Parent” from the “This machine” pop-up menu. “Static Address”
should be selected in the “Find NetInfo Parent via” pop-up menu and “network” should
appear in the NetInfo Server Tag field. Enter the server’s IP address in the NetInfo Parent
Address field.
5
Click Save, close NetInfo Domain Setup, and restart server2.
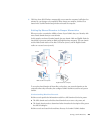
Step 4: Add a machine record for the root domain to the future English domain
Because the parent of the English domain resides on a different computer, you must add a
machine record for server1 to the English domain to identify the parent.
1
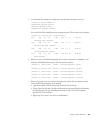
Open NetInfo Manager on server2 and open the network domain. You can open the network
domain by clicking the globe at the top of the NetInfo Manager window or choosing Open
Parent from the Domain menu.
2
Click the lock icon and log in as the root user.
3
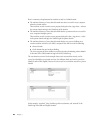
Select the machines directory in the Directory Browser list.
4
Choose New Subdirectory from the Directory menu. A property called “name” is created,
with a default value of new_directory. Double-click new_directory in the lower list and enter
server1.
5
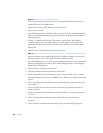
Choose New Property from the Directory menu. Double-click new_property and change it
to “ip_address.”
6
Choose New Value from the Directory menu. Double-click new_value and enter the IP
address of server1.
7
Choose New Property from the Directory menu. Double-click new_property and change it
to “serves.”
8
Choose New Value from the Directory menu. Double-click new_value and enter “../
myschool”.
9
Choose Save from the Domain menu and click Update Copy in the dialog that appears.