


58 Chapter 3
Set Up Masters
Use this procedure for servers hosting masters:
1 Log in as the root user to the server where the master resides.
2 Open the Terminal application, located in /Applications/Utilities.
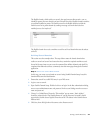
3 Enter the following command line, substituting the NetInfo tag name of the master for tag:
[server1:~] root# tim -init -auto tag
4 When prompted, enter and re-enter an encryption key:
Password for tag:
Re-enter to verify:
Initialize service for tag: Operation Succeeded
Enable autostart for tag: Operation Succeeded
5 Repeat steps 3 and 4 for the local domain and each additional master on the same server.
6 In the server’s /etc/hostconfig file, ensure that this line exists:
AUTHSERVER=-YES-
7 Restart the server or start Authentication Manager by entering this command line in the
Terminal application:
[server1:~] root# tim
8 Repeat steps 1 through 7 for each additional server hosting a shared domain in the
hierarchy that is not a clone.
Set Up Clones
Enabling Authentication Manager for each clone is somewhat simpler, because NetInfo
masters propagate information to their clones automatically. To set up Authentication
Manager for clones:
1 Copy the file containing the master’s encryption key to the clone’s /var/db/netinfo/
directory. You’ll find the master’s file in /var/db/netinfo/.tag.tim, where “tag” is the NetInfo
tag of the master.
2 Ensure that the /etc/hostconfig file on the clone’s server contains this line:
AUTHSERVER=-YES-
3 Restart the clone’s computer or start Authentication Manager by entering this command
line in the Terminal application:
[server1:~] root# tim
4 Repeat steps 1 through 3 for each server on which clones reside.