


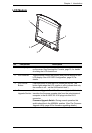

Chapter 2. Hardware Setup
17
Daisy Chaining
To control even more computers, up to 31 additional compatible KVM
switches can be daisy chained down from the KL1508 / KL1516.
Note: Since it would be unnecessarily wasteful and expensive to use KL1508
/ KL1516 switches for daisy chaining (there is no point in having
consoles on the chained switches), switches without LCD consoles are
used instead. See Supported KVM Switches, page 79, for a list of
supported switches.
As many as 512 computers can be controlled from the unit's integrated Dual
Rail console in a complete installation. See Connection Tables, page 69, for
tables showing the relation between the number of computers and the KVM
switches needed to control them.
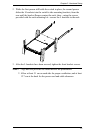
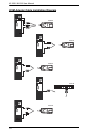
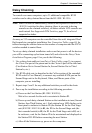
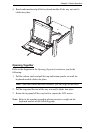
To set up a daisy chained installation: make sure that power to all the devices
you will be connecting up has been turned off, and refer to the Daisy Chain
Installation Diagram, page 18 as you do the following:
1. Use a daisy chain cable set (see Daisy Chain Cables, page 5), to connect
the Chain Out port of the parent unit to the Chain In port of the child unit
(First Station Out to Second Station In, Second Station Out to Third
Station In, etc.).
2. Use KVM cable sets (as described in the Cables section of the cascaded
KVM switch’s User Manual), to connect any available KVM port on the
Second Stage unit to the Keyboard, Video, and Mouse ports of the
computer you are installing.
3. Repeat steps 2 and 3 for any additional switches you add to the chain.
4. Power up the installation according to the following procedure:
a) Power on the First Station (KL1508 / KL1516).
Wait a few seconds for the unit to ascertain its Station ID.
b) Power up each daisy chained Station on the installation in turn (Second
Station, then Third Station, etc.). Each station has a LED display on its
front panel to indicate its Station ID (the Station ID for the First Stage
unit (KL1508 / KL1516) is 01, the ID for the Second Stage unit (the
first cascaded switch) is 02, the ID for the Third Stage unit is 03, etc.).
In each case, wait for the Station ID to be ascertained and displayed on
the Station ID LED before connecting the next Station.
c) After all the Stations are up, power on the computers.