


Product Overview
AXIS 5500 / AXIS 5550 User’s Manual 11
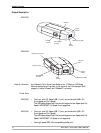
Test Button The test button is used for:
• printing a test page to check the connection to the printer
• printing the parameter list showing the print server settings
• performing a Factory Default of the print server, which will restore
most of the parameters and settings to factory default values
See “The Test Button” on page 129 for details.
Network Indicator The network indicator flashes to indicate network activity.
Power Indicator The power indicator is lit while power is applied. If it is not lit, or if it
flashes, there is a problem with the print server or its Power Adapter.
Compatible Printers All printers can be used except host-based printers (also known as CAPT,
GDI, PPA or Windows-based printers).
Mounting the AXIS 5500/AXIS 5550
Using the supplied clips, your AXIS 5500/AXIS 5550 can be mounted in
many ways, e.g. on the back of the printer, on a wall. It can be placed
behind the printer or next to a switch or a hub.
AXIS 5550 can also be inserted directly into the parallel port of the
printer.
Configuration and
Management
The print server can be configured and managed from its internal Web
pages, using HTTP as well as HTTPS in the secure mode. These Web pages
offer you a platform independent management tool that is suitable for all
supported network environments. See Using a Web browser for Print
Server Management, on page 88 for details.
Features and Benefits
Reliability The print server provides high performance and reliability combined with
low power consumption. The electronic circuits are based on the AXIS
ETRAX 100 LX chip, which comprises an integrated 32 bit RISC processor
and associated network controllers.
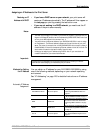
Adhesive
Clip
Fasten to print server by peeling off adhesive
tape.
Adhesive
Holder
Fasten to mounting surface by peeling off
adhesive tape.