


Adding Printers in NetWare
AXIS 5500 / AXIS 5550 User’s Manual 65
Basic Setup with AXIS NetPilot
Install the AXIS NetPilot software on your computer. AXIS NetPilot runs
on Windows 98 and Windows NT.
Starting the
Installation
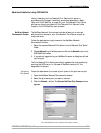
Follow the instructions below to install the AXIS 5500/AXIS 5550 with
AXIS NetPilot:
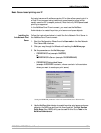
1. Start AXIS NetPilot by double-clicking the NetPilot icon, which is located
in the folder where you installed AXIS NetPilot.
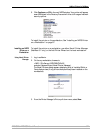
2. Locate the Axis Network Print Server in the ‘New Axis Units’ folder. Select
it and click the Install button on the AXIS NetPilot toolbar. If your network
is large, it could take a few seconds before the print server appears in the
folder.
3. Choose the with Installation Wizard option.
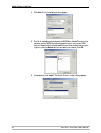
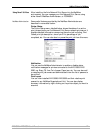
The AXIS NetPilot Installation Wizard guides you through the installation
process. The following options are available:
Note:
Print Server Name The default print server name consists of the characters ‘AXIS’ followed
by the last six digits of the serial number. If you want to change the print
server name, just type the new name in the available text field.
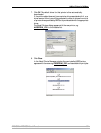
Environments Choose which networking environments you want to configure the Axis
Network Print Server for, e.g. NetWare, TCP/IP, Windows or Macintosh. If
your network comprises various different platforms, you can enable any
combination of environments.
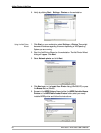
NetWare NDS Place NetWare Print Queues on a specific bindery server, or alternatively
into an NDS Tree.
The IP address Choose the method the Axis Network Print Server should employ for
obtaining an IP address. DHCP, ARP, RARP, BOOTP and Auto-IP are
supported. You can also select to set the IP address manually. Refer to
“Assigning an IP Address to the Print Server” on page 15 for further
information about setting the IP address.
The number of options varies according to the number of environments you enable.