


5. Physical installation
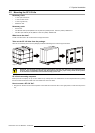
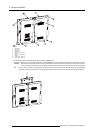
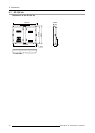
A Adjust block screw.
B Long allen key(14mm)
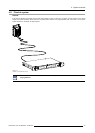
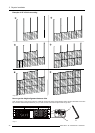
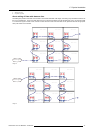
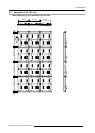
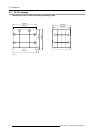
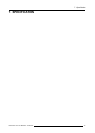
About cabling of Data cable between tiles.
Considering the position of the data in/out sockets in SF-10Vtiles and dataI cable length, the cabling ways illustrated as follows are
the only 2 possible ways. That is, the data cable must go into the SF-10Vdisplay from the left side (back view), connect all the tiles
in a column from upper or lower corner, and then connect the next column from the other corner, repeat this from left to right (back
view) until all tiles are connected.
DVI-in
DVI-out
AC-in
AC-out
DVI-in
DVI-out
AC-in
AC-out
DVI-in
DVI-out
AC-in
AC-out
DVI-in
DVI-out
AC-in
AC-out
DVI-in
DVI-out
AC-in
AC-out
DVI-in
DVI-out
AC-in
AC-out
DVI-in
DVI-out
AC-in
AC-out
DVI-in
DVI-out
AC-in
AC-out
DVI-in
DVI-out
AC-in
AC-out
S
F-1
0v
D
ata s
i
gna
l
S
F-
10v
S
F-1
0v
S
F-
10v
S
F-
10v
S
F-1
0v
S
F-1
0v
S
F-
10v
S
F-1
0v
Image 5-8
DVI-in
DVI-out
AC-in
AC-out
DVI-in
DVI-out
AC-in
AC-out
DVI-in
DVI-out
AC-in
AC-out
DVI-in
DVI-out
AC-in
AC-out
DVI-in
DVI-out
AC-in
AC-out
DVI-in
DVI-out
AC-in
AC-out
Data signal
S
F-1
0v
S
F-
10v
S
F-
10v
S
F-
10v
S
F-
10v
S
F-
10
v
DVI-in
DVI-out
AC-in
AC-out
DVI-in
DVI-out
AC-in
AC-out
DVI-in
DVI-out
AC-in
AC-out
S
F-1
0
v
S
F-
10v
S
F-
10v
Image 5-9
R59770542 SF-10V DISPLAY 10/02/2012 37