


13
1
2
3
4
5
6
7
8
section
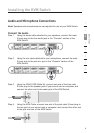
Using the KVM Switch
To modify the hot-key preceding sequence from the default Scroll Lock, you can
either hit the hot-key sequence: scrlk – scrlk – H – (y), y = SCROLL LOCK, CAPS,
ESC, F12 or NUM LOCK (as detailed in the Hot-Key Quick Reference Table below).
or
You can use another method: Press and hold the last button to enter the hot-key
setting mode.
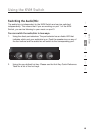
Step 1. Press and hold the last button (i.e., the second button on the 2-port model
or the fourth button on the 4-port model) till you hear two beeps. Then
release the button.
Step 2. Within two seconds, you should hit any of the selectable hot-key triggers
(y), y = SCROLL LOCK, CAPS, ESC, F12, NUM LOCK, LEFT CTRL, or
RIGHT CTRL to be your hot-key trigger.
For example, if you hit CAPS after hearing the two beeps, then the hot key will be:
CAPS – CAPS – command key.
For detailed hot-key sequences and their corresponding functional commands,
please refer to the Hot-Key Quick-Reference Table below.
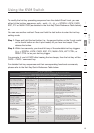
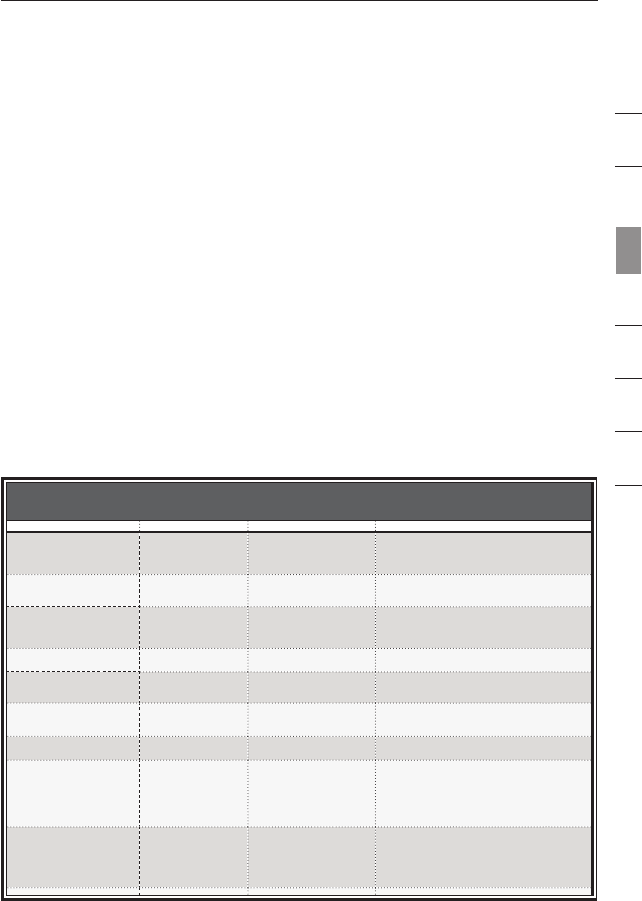
Hot Key Quick Reference Table
2-/4-Port SOHO KVM Switch with Audio -- & Mic -- Operation Commands for Hot Keys/Front-Panel Buttons
Hot-key sequence = [ScrLk] + [ScrLk] + Command key(s)
* user-denable preceding sequence = SCROLL LOCK, CAPS, F12 or NUM LOCK, LEFT_CTRL, RIGHT_CTRL
Command Hot Keys
1
Front-Panel Buttons Description
Select Computer Channel
2
(Joint-select PC port/audio
& mic, if binding is enabled)
ScrLk + ScrLk + (x)
(x is a top-row number
key) x = 1~2 / x = 1~4
for PC channel no.
Press the computer icon on
the left of a button to select
the active computer channel
Select the active computer channel
(Hot key: Joint-select PC port/audio & mic,
if binding is enabled)
Select Audio & Mic Channel
2
(Joint-select PC port and audio
& mic, if binding is enabled)
ScrLk + ScrLk + (Fy)
Fy = F5~F6/Fx=F5~F8
(Fy is a function key)
--
Select the active audio & mic channel
(Hot key: Joint-select PC and audio & mic channel,
if binding is enabled)
Bind Computer and
Audio & Mic Switching
2
[Default]
ScrLk + ScrLk + Q --
Enable the binding of PC port and audio & mic
switching. (Hot key: Once this feature is enabled, any
computer and/or audio & mic switching by hot keys is
bound together) (factory default)
Unbind PC and
Audio & Mic Switching
2
ScrLk + ScrLk + W --
Disable the binding of PC port and audio
& mic switching
Next lower PC channel
2
(Joint-select PC/audio & mic,
if binding is enabled)
ScrLk + ScrLk +
(arrow up)
--
Select the next lower connected PC channel
(Hot key: Joint-select PC/audio & mic, if binding
is enabled)
Next higher PC channel
2
(Joint-select PC/audio & mic,
if binding is enabled)
ScrLk + ScrLk +
(arrow down)
--
Select the next higher connected PC channel
(Hot key: Joint-select PC/audio & mic, if binding
is enabled)
Previous PC channel
ScrLk + ScrLk +
Backspace
--
Toggle between the previous channel and
current channel
Dene Hot-Key
Preceding Sequence
ScrLk + ScrLk +
H + (y)
y = SCROLL LOCK,
CAPS, ESC, F12, NUM
LOCK, LEFT_CTRL,
or RIGHT_CTRL
Press and hold down last
button (Button 2 / Button 4)
until you hear three beeps,
release the button, and then
press (y) key. This resets
hot-key preceding sequence
to SCROLL LOCK.
Select the hot-key preceding sequence among
6 alternative keys
Read KVM
Firmware Version
Open Note Pad
ScrLk + ScrLk + V
--
Read the version of rmware that is currently on
the KVM Switch. This is helpful when a rmware
upgrade is performed as it gives you the ability to read
the version of rmware, before and after the upgrade,
to ensure the rmware has installed correctly.