


ASYNC ROUTER AR-P, AR-5, AND SYNC ROUTER USER’S MANUAL
93
After making your changes, enter
exit <RETURN>
A line of the format “ip address xxx.xxx.xxx.xxx” will be found near the top of the file. If the address is
incorrect, run setaddr again or edit the file directly to set the desired IP address for the Router. For more
information about the setaddr utility, refer to Chapter 3.
Also—If the remote hosts support ping, use the ping command to verify connectivity. Issue the ping
command on the machine from which you are trying to telnet. The destination address used when
issuing the ping command should be the Router IP address. If you are able to successfully receive a
response from the Router when using the ping command and are unable to telnet to the Router, call for
technical support.
If possible, display the contents of the ARP table on the machine from which you issued the telnet
command. See if there is a complete entry for the Router Ethernet/IP address mapping.
C.3.6 C
ANNOT SAVE CONFIGURATION
The following message displays during configuration:
Cannot create configuration file config.tmp
Make sure the floppy disk is write enabled
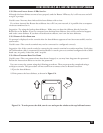
Possible cause—The Router boot diskette is write-protected.
Suggestions—Remove the Router boot diskette and make sure that it is not write-protected (hole is not
open). Complete the configuration procedure again and save it.
C.3.7 W
HY DON’T THE MODEMS CONNECT?
If you are having problems connecting over the WAN interface, you can enable additional error
messages by using the command:
tcp syslog on
This will send all of the syslog messages to the console. When a dialup connection is made, you shoudl
see messages such as:
iface dialup link appears to be up
or
iface CHAP peer says: Welcome
If you see a message like:
iface call failed: NO DIALTONE
then you may have a problem with your phone line. If you see a message like:
iface CHAP failed to verify: remote name
then the names and link passwords between the two systems may not be set up correctly. Refer to the
password example and worksheet in the Installation Reference, which begins on page 137.
When you are done, disable the syslog messages by issuing the command:
tcp syslog off