


5. Press the RIGHT BLACK OVAL key. The front panel display will
show “REMOVE RIBBON CANCEL CONTINUE.”
6. Either remove the ribbon or slide it as far from the printer frame as
possible.
7. Close the printhead, trapping the ribbon in this position.
8. Press the RIGHT BLACK OVAL key. The front panel will show
“CALIBRATING PLEASE WAIT.”
9. When this part of the calibration process is completed, the display will
read “RELOAD ALL CONTINUE.”
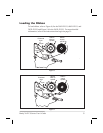
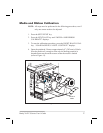
10. Open the printhead. Pull the backing material until a label is positioned
between the media sensors.
11. Either load the ribbon or return the ribbon to its proper position.
12. Close the printhead. Press the RIGHT BLACK OVAL key to perform
the next part of the calibration sequence. “MEDIA AND RIBBON
CALIBRATE” displays. The printer is calibrated when the media stops
feeding.
13. Press the SETUP/EXIT key to leave the programming mode. Choose
“permanent” when SAVE CHANGES displays.
18 Brady X-PLUS Series User’s Guide